ONYX - 9.0 - Utilisation - Fonctionnement des groupes/en
Différence entre versions
(Page créée avec « <u>Note</u>: This process is repeated for each line of the groupe. ») |
|||
| Ligne 160 : | Ligne 160 : | ||
#<span style="color:green">The group switches to the next line so as to process it. '''Checks point 1'''</span> | #<span style="color:green">The group switches to the next line so as to process it. '''Checks point 1'''</span> | ||
| − | <u>Note</u>: This process is repeated for each line of the | + | <u>Note</u>: This process is repeated for each line of the group. |
<u>Le groupe peut être de deux types</u> : | <u>Le groupe peut être de deux types</u> : | ||
Version du 29 juillet 2019 à 13:11
Introduction
This documentation describes how groups of the Designer module work. Understanding these processes is necessary to then understand the documentation on creating dynamic tables on Designer Onyx 9.x or Opale 10.x.
General information
Definition of a group
In Designer, a group is a block which processes several lines in a sequential way.
There are 2 types of input data in Designer:
- Paginated text
- In paginated text mode, a group processes the content of a paginated text from one line number to another. (or from one line respecting a specific condition to the next one respecting said condition).
- XML
- In XML mode, the group processes all the lines (line type <line name="XX"></line>) which it will own.
note: To process is the verb used, to display or to print are incorrect because the group parses all the lines it will own. For each of them and in a sequential way, it searches for their line condition (or line type) and executes all the objects linked to that condition. If it is the case, all the objects are executed so that they can be displayed. (Line, text zone, zone displaying input file data, etc)
If the group is configured as exclusive condition, then the first condition found executes the objects while other conditions will not be executed.
Otherwise, if the group is configured as non exclusive condition, then all conditions applied are executed with their associated objects.
Vocabulary
Baseline : Line which acts as reference to position the objects of the group.
note: This reference line moves towards the bottom each time a new line is executed, it follows this order:
- "Front spacing" shift
- Each object of the line is processed
- "After spacing" shift
Front spacing: Space dedicated to the line written above the baseline
After spacing: Space dedicated to the line written below the baseline
Work space: Space dedicated to the entire line: i.e Front spacing + After spacing
Content of a group
In paginated text mode
Here is an example of the content of a group. The group processes the content of the page from line 1 to line 10.
Concerning line conditions or line types, if you wish to process the first line "MAPPING SUITE" differently, then create a line type which only applies to the first line. (For example: there is the term "MAPPING SUITE" on the line or use the "first line" operator)
In XML mode
Here is an example of an XML group.
<group name="MyGroup">
<line name="MyLine1">
<field name="MyField">MAPPING SUITE</field>
</line>
<line name="MyLine2">
<field name="MyField">SAS (simplified joint-stock company) with a capital of 1 000 000 €</field>
</line>
<line name="MyLine3">
<field name="MyField">18 Allée du Chateau blanc</field>
</line>
<line name="MyLige4">
<field name="MyField">59290 WASQUEHAL</field>
</line>
</group>
In this case, if you want to process the "MAPPING SUITE" line differently, create a line condition "If the name of the line is MyLine1"
Group mechanisms
General information
As seen previously, the lines of a group are parsed sequentially and their associated objects are executed. Once a group has been executed, the result is usually a series of lines. (with their associated objects as content: Line, text, rectangle for example)
There needs to be spacing between the lines of the group. If this spacing is higher than 0, than all the lines of the group are overlaid on each over.
This spacing can be configured and is related to the line type (condition) associated with this object.
Which is why we talk about Front spacing and After spacing.
Detailed diagram
The diagram below illustrates the concept of baseline, lines and workspace.
The spacing between two new lines of the group is defined by: Front spacing + After spacing (which corresponds with the workspace).
Position of the different objects in comparison to the baseline
The different objects are not always positioned in the same place in comparison to the baseline.
It is important to understand it to fully master template designing. This concept is useful to understand when creating dynamic tables.
Designer blue zone
Text is positioned on the baseline of the zone.
Horizontal line
The horizontal line is positioned on top of the baseline.
Verticale line
The top of the vertical line is positioned underneath the baseline.
Rectangle
The rectangle is positioned on the baseline.
Image
The image is positioned underneath the baseline (i.e underneath the blue zone).
1D Barcodes
1D barcodes are positioned on top of the baseline (they act in the same way text does).
Traitement des lignes
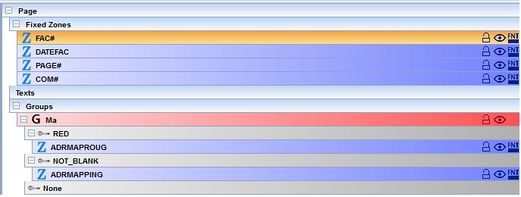
The list of all the objects in the template is found among the list of Designer objects (MAP or DRAW tab). Groups and line types (conditions) are executed following the order laid out by this list. The line types (conditions) which are the lowest in the group are executed after the line types (conditions) which are the highest. In the following example, the line type (condition) RED is checked before the line type NOT_BLANK
Note:
Objects outside groups are executed in the following order:
- Zone (outside of groups)
- Groups
- Text zones
- Graphs
If we consider the following list of objects:
There are 4 zones which are outside of a group (FAC#, DATEFAC, PAGE# and COM#). There is also a group (Ma) which has 2 conditions (RED and NOT_BLANK) each with an associated object (a zone which displays the content of the line). For the purpose of this documentation, we will focus on this group (Ma)
The group processes the lines as such:
- The group parses the current line as it checks if it corresponds to the conditions of the first type of lines. (Condition RED)
- YES --> Checks point 2
- NO --> The group checks if the next line corresponds to the type of line (condition) (Type of line NOT_BLANK)
- YES --> Checks point 2
- NO --> The group checks if the next line corresponds to the type of line (condition) etc
- If there are more types of lines (condition) which are customised, then the NONE type of line is executed (Type of line which is always present and true). Checks point 2
- Checks the presences of an object in the type of line (condition)
- YES --> Checks point 3
- NO --> Checks point 6
- The cursor is moved to the bottom of the FRONT SPACING of the type of line (condition) found
- The group either executes all the objects positioned underneath it (In this example, ADRMAPROUG for the RED condition OR ADRMAPPING for the NOT_BLANK condition) or no objects for the type of line NONE
- The cursor is moved to the AFTER SPACING of this type of line (condition).
- The group switches to the next line so as to process it. Checks point 1
Note: This process is repeated for each line of the group.
Le groupe peut être de deux types :
- Condition Exclusives : Dans le traitement décrit ci-dessous, le premier type de ligne (condition) qui est vrai sera exécutée. Designer ne vérifiera pas les autres les types de ligne (conditions). (Du coup l'ordre des conditions dans la liste des objets est très important. (Dans notre cas le tye de ligne RED sera vérifié avant NOT_BLANK)
- Condition non Exclusives : Dans les groupes à conditions non Exclusives, Designer vérifiera tous les types de ligne du groupe et exécutera tous ce qui sont vrai. (Type de ligne AUCUNE inclus)
Remarque : Il est possible de changer l'ordre d'exécution des types de ligne. Pour ce faire, il faut sélectionner le type de ligne à modifier et le monter ou descendre avec les flèches du haut ou du bas présentent dans la fenêtre de la liste des objets.
Exemples
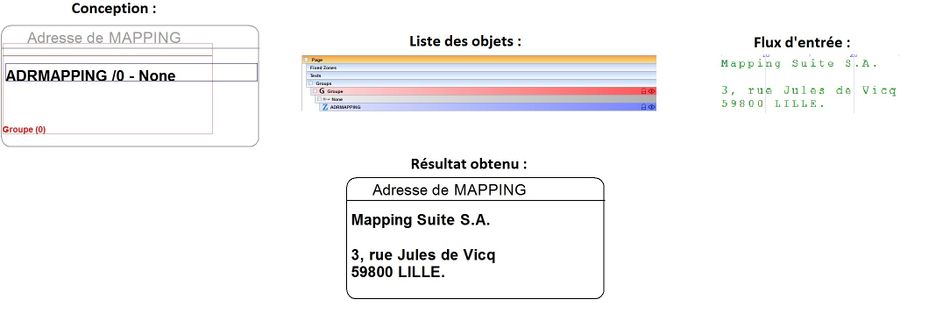
Affichage simple de plusieurs lignes
La combinaison d'un groupe et d'une zone à l'intérieur de ce groupe permet l'affichage de plusieurs lignes
Paramétrage du groupe : Condition exclusive, Espacement avant du type de ligne AUCUNE : 0.60cm, Espacement après du type de ligne AUCUNE : 0cm
En suivant la procédure de traitement expliquée précédemment, la zone ADRMAPPING ayant pour type de ligne AUCUNE (NONE) va être exécuté sur toute les ligne du groupe. L'espacement avant du type de ligne aucune étant de 0.60cm, le groupe va alors :
- Vérification pour la ligne en cours que le type de ligne (condition) AUCUNE corresponde bien --> OUI
- Vérification qu'il y ait bien un objet dans le type de ligne (condition) AUCUNE --> OUI il y a ADRMAPPING
- Descendre le curseur de 0.60cm (espacement avant du type de ligne AUCUNE)
- Exécuter les objets appartenant au type de ligne AUCUNE (la zone ADRMAPPING imprimant le contenu du flux d'entrée)
- Descendre le curseur de 0cm (espacement après)
Et répéter ce traitement pour toutes les autres lignes du groupe.
Suppression des lignes blanches
La combinaison d'un groupe et d'une zone à l'intérieur de ce groupe permet l'affichage de plusieurs lignes. Si cette zone appartient à un type de ligne excluant les lignes à contenu vide, alors cette combinaison ne n'imprimera uniquement les lignes pas vide. Le résultat sera une impression sans ligne blanche.
Paramétrage du groupe : - Condition exclusive - Espacement avant du type de ligne AUCUNE : 0.60cm - Espacement après du type de ligne AUCUNE : 0cm - Espacement avant du type de ligne NOT_BLANK : 0.60cm - Espacement après du type de ligne AUCUNE : 0cm
Paramétrage du type de ligne NOT_BLANK :
NOT (Il y a sur la ligne en cours de la colonne 6 à la colonne 12 la valeur " ")
En suivant la procédure de traitement expliquée précédemment, la zone ADRMAPPING ayant pour type de ligne NOT_BLANK va être exécuté sur les lignes n'ayant pas de ligne vide. L'espacement avant du type de ligne aucune étant de 0.60cm, le groupe va alors :
- Traitement de la ligne en cours (cas d'une ligne non vide) :
- Vérification pour la ligne en cours que le type de ligne (condition) NOT_BLANK corresponde bien --> OUI
- Vérification qu'il y ait bien un objet dans le type de ligne (condition) NOT_BLANK --> OUI il y a ADRMAPPING
- Descendre le curseur de 0.60cm (espacement avant du type de ligne NOT_BLANK)
- Exécuter les objets appartenant au type de ligne NOT_BLANK (la zone ADRMAPPING imprimant le contenu du flux d'entrée)
- Descendre le curseur de 0cm (espacement après du type de ligne NOT_BLANK)
- Traitement de la ligne en cours (cas d'une ligne vide) :
- Vérification pour la ligne en cours que le type de ligne (condition) NOT_BLANK corresponde bien --> NON
- Vérification pour la ligne en cours que le type de ligne (condition) AUCUNE corresponde bien --> OUI
- Vérification qu'il y ait bien un objet dans le type de ligne (condition) AUCUNE --> NONE (il n'y a pas d'objet)
- Traitement de la prochaine ligne du groupe : Ligne 3, passage au point 1
(Et répéter ce traitement pour toutes les autres lignes du groupe)
Formatage particulier sur la première ligne
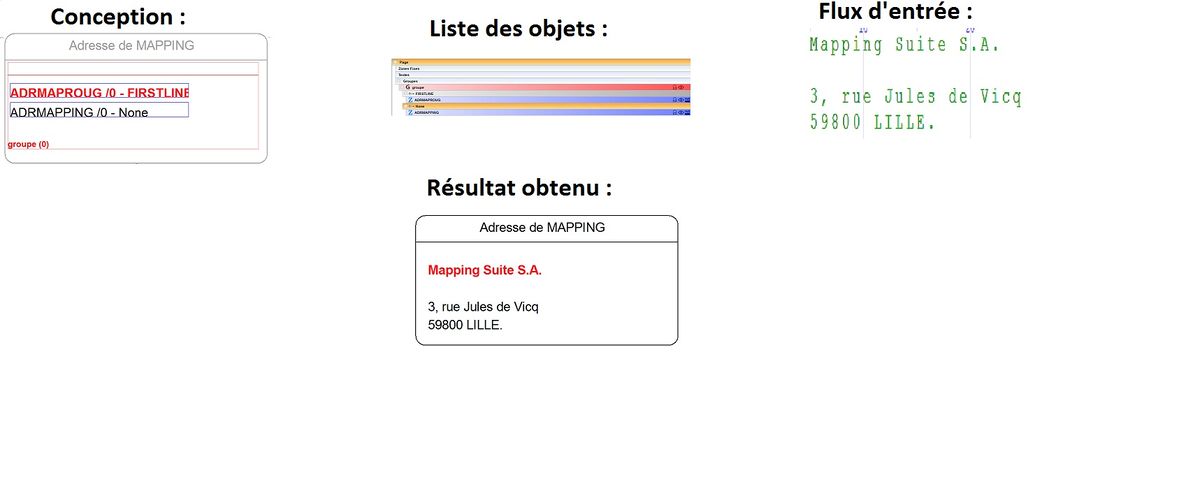
La combinaison d'un groupe et de deux zones à l'intérieur de ce groupe permet un affichage particulier pour la première ligne du groupe et un autre pour les autres lignes.
Dans cet exemple, nous allons créer un type de ligne vrai pour la première ligne du groupe (contenu : Mapping entre les colonnes 6 et 12) et laisser le type de ligne AUCUNE afficher le reste du groupe.
Paramétrage du groupe :
- Condition exclusive
- Espacement avant du type de ligne AUCUNE : 0.60cm
- Espacement après du type de ligne AUCUNE : 0cm
- Espacement avant du type de ligne FIRSTLINE : 0.60cm
- Espacement après du type de ligne FIRSTLINE : 0cm
Paramétrage du type de ligne FIRSTLINE :
Il y a sur la ligne en cours de la colonne 6 à la colonne 12 la valeur "Mapping")
En suivant la procédure de traitement expliquée précédemment, la zone ADRMAPPING ayant pour type de ligne FIRSTLINE va être exécuté sur les lignes ayant Mapping pour valeur entre leurs colonnes 6 et 12. L'espacement avant du type de ligne aucune étant de 0.60cm, le groupe va alors :
- Traitement de la ligne en cours (cas d'une ligne Mapping) :
- Vérification pour la ligne en cours que le type de ligne (condition) FIRSTLINE corresponde bien --> OUI
- Vérification qu'il y ait bien un objet dans le type de ligne (condition) FIRSTLINE --> OUI il y a ADRMAPROUG
- Descendre le curseur de 0.60cm (espacement avant du type de ligne FIRSTLINE)
- Exécuter les objets appartenant au type de ligne FIRSTLINE (la zone ADRMAPROUG imprimant le contenu du flux d'entrée)
- Descendre le curseur de 0cm (espacement après du type de ligne NOT_BLANK)
- Traitement de la ligne en cours (cas d'une ligne autre que Mapping) :
- Vérification pour la ligne en cours que le type de ligne (condition) FIRSTLINE corresponde bien --> NON
- Vérification pour la ligne en cours que le type de ligne (condition) AUCUNE corresponde bien --> OUI
- Vérification qu'il y ait bien un objet dans le type de ligne (condition) AUCUNE --> OUI il y a ADRMAPPING
- Exécuter les objets appartenant au type de ligne AUCUNE (la zone ADRMAPPING imprimant le contenu du flux d'entrée)
- Descendre le curseur de 0cm (espacement après du type de ligne AUCUNE)
- Traitement de la prochaine ligne du groupe : Ligne 3, passage au point 2
(Et répéter ce traitement pour toutes les autres lignes du groupe)
Donner plus de place à la première ligne
A COMPLETER
Création d'un tableau dynamique simple
A COMPLETER


