OPALE - 10.0 - Utilisation - La commande MAP XPS/en
Différence entre versions
m (FuzzyBot a déplacé la page ONYX:9.0:Utilisation:La commande MAP XPS/en vers OPALE:10.0:Utilisation:La commande MAP XPS/en sans laisser de redirection : Extrait de la page à traduire « ONYX:9.0:Utilisation:La commande MAP XPS ».) |
|
| (3 révisions intermédiaires par le même utilisateur non affichées) | |
(Aucune différence)
| |
Version actuelle datée du 30 octobre 2019 à 15:14
Sommaire
- 1 Introduction
- 2 Converting files
- 3 Adding indexing criteria to a document
- 4 Extracting criteria values of a document
- 5 Exporting indexes and their values
- 6 Using indexing criteria
- 7 Concatenating XPS files
- 8 Managing PrintTickets
- 9 Sending an e-mail
- 10 Mapping and printing – Redirecting to an OUTQ
- 11 Transferring the log in a file
- 12 Listing the resources
- 13 Extracting pages
- 14 Extracting XML data (in Designer)
- 15 Formats and size of a document's pages:
- 16 Rotating documents
- 17 Adding an overlay to an existing document
- 18 Managing input boxes
Introduction
the MAP_XPS command is one of the main commands of OPALE Server. It allows you to process files for multiple final purposes.
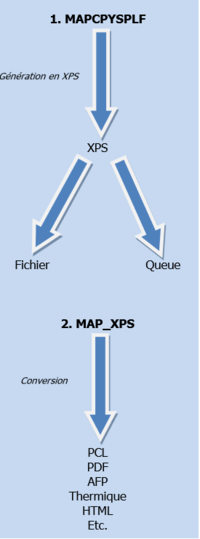
The usal processing involves a file to map which is first generated in XPS format using the MAPCPYSPLF command, the MAP_XPS command is then used to edit this XPS file.
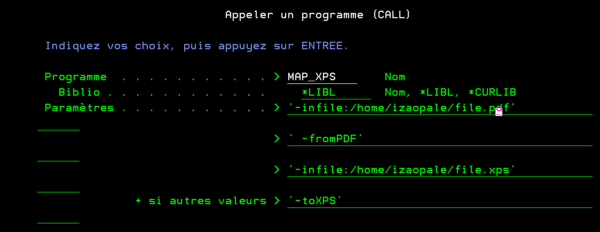
To use the MAP_XPS command, run a CALL PGM(MAP_XPS) PARM ('-infile:/home/map2019/file.PDF' '-outfile:/home/map2019/file.xps' '-toXPS' '-fromPDF')
The MAPXPS command (without underscore) also exists. This one does not have as many applications and is mainly useful to convert files.
Converting files
Converting input files
Converting existing files to XPS is done to prepare them for future processing in the Mapping software.
The supported input languages are: AFP, ESCP, IGP, Image (BMP, JPG, PCX, PNG et TIFF), PCL, PDF, PS, SCS, TXT, Xerox, XPS, ZEBRA (ou ZPL), TEC
Examples:
map_xps -infile:/home/map2019/email.pcl -fromPCL -outfile:/home/map2019/email.xps -toXPS
map_xps -infile:/home/map2019/email.pdf -fromPDF -outfile:/home/map2019/email.xps -toXPS
map_xps -infile:/home/map2019/email.afp -fromAFP -outfile:/home/map2019/email.xps -toXPS
map_xps -infile:/home/map2019/email.igp -fromIGP -outfile:/home/map2019/email.xps -toXPS
map_xps -infile:/home/map2019/email.zpl -fromZPL -outfile:/home/map2019/email.xps -toXPS
map_xps -infile:/home/map2019/email.ps -fromPS -outfile:/home/map2019/email.xps -toXPS
map_xps -infile:/home/map2019/image.jpg -fromImage -outfile:/home/map2019/image.xps -toXPS -profile:fromJPEG
Such conversions can also be refined using a profile defined in the configuration file.
Converting XPS files to an output format
The aim is to convert XPS files (whether generated by Mapping or not) depending on their final purpose (printing, e-mail, archiving...) and communication channel.
The supported output formats are: AFP, BMP, DOCX, DPL, EPL, ESC, ESCP, HTML, IGP, JPG, Monarch, PCL, PDF, PNG, ProPrinter, PS, RTF, TEC, TIF, TXT, XMLDRAW, XPS, ZEBRA / ZPL.
Examples:
map_xps -infile:/home/map2019/email.xps -toPCL -outfile:/home/map2019/email.pcl
map_xps -infile:/home/map2019/email.xps -toPDF -outfile:/home/map2019/email.pdf
Such conversions can also be refined using a profile defined in the configuration file.
Example :
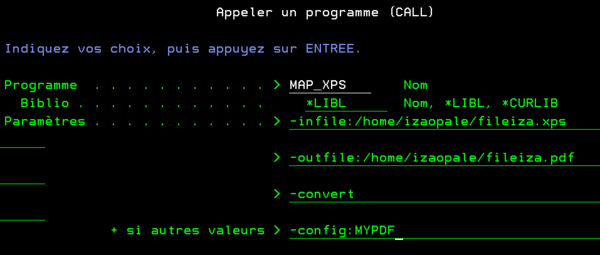
map_xps -infile:/home/map2019/email.xps -outfile:/home/map2019/email.pdf –convert –config:MYPDF
Using parameters:
-config:XXXXor-profile:XXXX=> to select the profile-convert=> converts the file using the selected profil
And a MYPDF profile defined in the configuration file:
<MYPDF>
<label>for Adobe Reader</label>
<language>PDF</language>
<embeddedfont>OFF</embeddedfont>
<color>ON</color>
</MYPDF>
To call a conversion profile as a command line, the language needs to be set to *AUTO on IBM i, and should not be "forced" on Unix or Windows (for instance, do not use arguments -profile:XXX and -toPCL simultaneously).
Note:
On IBM i, the XPSConfig.conf file is located in the home/mapping folder.
Specific parameters used for an AFPDS output
In addition to converting the file from XPS to AFPDS, you can force the resolution of fonts and images:
-fontRes:300: fonts resolution
-imageRes:300: images resolution
Supported values: 240, 300 or 600 dpi.
Using profile parameters
All parameters mentioned and described here (input or output) can also be used as command lines. To use them as such, add the following to the map_xps conversion command: -param:name_of_the_parameter=value
Example:
map_xps -infile:/home/map2019/label.xps -outfile:/home/map2019/label.zpl -toZPL -param:resolution=203 -param:barcode=off
Managing indexing criteria
List all available indexes and their values
To list all indexing criteria in the file
Example:
map_xps -infile:/home/map2019/email.xps -dumpIndex
To list all index values in the file called indexing of a document
Example:
map_xps -infile:/home/map2019/email.xps –dumpIndex:CUSTOMER
Adding an index value on all pages of a document
In some cases, an indexing criteria can be present on all pages but some of them do not have index values, in other cases the indexing criteria is not present on all the pages. The following command is then used to reindex the document by copying the index values that are on the previous page onto the pages without index values.
Example:
map_xps -infile:/home/map2019/email.xps –copyEmptyIndex:INVOICE
A file before the command was run:
Page	Index	Value
1	INVOICE	1
2

3	INVOICE	2
4	INVOICE	3
5
File after the command was run:
Page	Index	Value
1	INVOICE	1
2	INVOICE	1
3	INVOICE	2
4	INVOICE	3
5	INVOICE	3
Adding indexing criteria to a document
The aim is to index a document by adding criteria to it.
The values of every criterion can be specified in the command line: all the pages of the document will then have the same index value.
Example:
map_xps -infile:/home/map2019/email.xps -addCriteria:NUMORDER=123456
Index values usually come from a prior extraction of information in the document and are stocked in a temporary text file (as can be seen below). This syntax uses the keyword "File" to indicate that the added index values need to be extracted from the file created earlier.
Example:
map_xps -infile:/home/map2019/email.xps -addCriteria:NUMORDER=FILE:/home/map2019/email.txt [ –outfile:/home/map201/email_indexed.xps]
Extracting criteria values of a document
The aim is to look for information in the document to extract it and copy it in a temporary file so as to add it as indexing criteria of the same document afterwards. The temporary file created is in text format, in Unicode, with the following syntax: "value[TAB]page[CRLF]"
The information can be collected using keywords or locations.
The extra spaces before and/or after the text can be trimmed off so that the information returned does not include them. This is done using the following parameters:
-ltrim: deletes spaces before the text
-rtrim: deletes spaces after the text
-trim: deletes spaces before and after the text
Example 1: keyword research
map_xps -infile:/home/map2019/email.xps -extract:/home/map2019/email.txt
"-filter:Invoice for order" -length:10 –shift:2 -rtrim
10 characters are extracted, located 2 characters after the "Invoice for order" keyword, while the unwanted space after the returned text is deleted
Example 1: research per location
map_xps -infile:/home/map2019/email.xps -extract:/home/map2019/email.txt "-box:100,150,180,30,mm"
The parameters of the "box" specify its dimensions. The syntax is: xx.xx,xx.xx,xx.xx,xx.xx[,cm|in|mm]
4 decimal numbers, specifying respectively: top, bottom, left, right
The dot is the decimal delimiter
The comma or semi-colon is the values delimiter
The last parameter is the unite of these coordinates: in dots per inch (for a resolution of 96dpi) by default, in millimeters (mm),in centimeters (cm) or in inches (in)
Exporting indexes and their values
The aim is to create an index file from a document that would be archived in another software later on. This index file can be in TXT, XML or IND (compatible with CMSs) format.
The "-duplicateindex" parameter also exports indexes with the same value on multiple pages.
Examples:
map_xps -infile:/home/map2019/mail.xps -indexfile:/home/map2019/file.txt –toXPS [-duplicateindex]
map_xps -infile:/home/map2019/email.xps -indexfile:/home/map2019/file.xml -toXPS [-duplicateindex]
map_xps -infile:/home/map2019/email.xps -indexfile:/home/map2019/file.ind -toXPS [-duplicateindex]
Using indexing criteria
Sorting a document
The aim is to sort a document depending on the value of the indexing criteria. Only one output file will be created. The document is sorted by ascending order of numeric values by default. The ALPHA option allows you to sort with alphanumeric values and the REVERSE option allows you to sort by descending order.
Examples:
map_xps -infile:/home/map2019/email.xps -outfile:/home/map2019/email.pdf –sort:CUSTNBR -toPDF
map_xps -infile:/home/map2019/email.xps -outfile:/home/map2019/email.pdf –sort:ALPHA:MAPSEND -toPDF
map_xps -infile:/home/map2019/email.xps -outfile:/home/map2019/email.pdf –sort:CUSTNBR,INV_NBR -toPDF
map_xps -infile:/home/map2019/email.xps -outfile:/home/map2019/email.pdf -sort:CUSTNBR,REVERSE:INV_NBR -toPDF
Spliting a document
The aim is to split a document depending on the values of indexing criteria. You can create as many output files as there are different criteria values.
Example:
map_xps -infile:/home/map2019/email.xps -outfile:/home/map2019/email_[[MAPSEND]].pdf –toPDF
The BUNDLEONINDEX creates bundles depending on the number of pages for every criteria value (for instance: 1 file with documents of 1 to 4 pages, 1 file with documents of 5 to 9 pages, 1 file with documents of more than 10 pages). You can create as many bundles as you would like to.
Example:
map_xps -infile:/home/map2019/email.xps -outfile:/home/map2019/email_[[BUNDDLEONINDEX,MAPSEND,1,5,10]].pdf –toPDF
In the BUNDLEONINDEX mode, the document can also be split depending on the number of the number of pages (that is to say whether the final page will be simplex/duplex or not), the the syntax is:
map_xps -infile:/home/map2019/email.xps -outfile:/home/map2019/email_[[BUNDDLEONINDEX=LEAF,MAPSEND,1,5,10]].pdf –toPDF
Filters based on criteria values
the aim is to put some pages apart of the rest of the document depending on the values of indexing criteria. This can be useful to create an input document which is only intended for specific customers.
Examples:
map_xps -infile:/home/map2019/email.xps -outfile:/home/map2019/email.pdf -toPDF –filter:CUSTOMER=426
map_xps -infile:/home/map2019/email.xps -outfile:/home/map2019/email.pdf -toPDF "-filter:(CUSTOMER=4026) OR (CUSTOMER=1458) AND (PRICE=15)"
This can also be useful to run actions on specific pages only depending on criteria values (to manage PrintTickets for example)
Concatenating XPS files
The aim is to add several documents one after the other. The output document is the concatenation of all files specified in the command line, in the order they were placed.
You could then sort depending on indexing criteria which was defined beforehand in every file to merge files from different sources (invoice + standard form contract + newsletter…)
Examples:
Concatenating several XPS files in one go:
map_xps -outfile:/home/map2019/final.xps -add:/home/map2019/test1.xps -add:/home/map2019/test2.xps –add:/home/map2019/test3.xps
Concatenating several times when you do not already know the number of input XPS files:
 map_xps -tempfile:/home/map2019/final.xps -add:/home/map2019/test1.xps
 map_xps -tempfile:/home/map2019/final.xps -add:/home/map2019/test2.xps
 map_xps -tempfile:/home/map2019/final.xps -add:/home/map2019/test3.xps
Managing PrintTickets
The aim is to manage different parameters of a document printing job, either at job level or page level.
The syntax is:
map_xps -infile:/home/map2019/email.xps -set:NOM=VALEUR
The "-filter:XXX" option allows you to assign a printing attribute for some pages only, depending on the indexing values of the document.
the different "PrintTicket" attributes are:
DUPLEX: manages simplex/duplex
- yes/no: double-sided using the long edges, or simplex only
- long/short/F: doubled sided using the long or short edges, or simplex only
FRONTSIDE (on/off): forces the print to be on the simplex side (with PCL output only, combined with options -filter:XXX and -pages:*)
INPUTBIN / OUTPUTBIN (numerical value): managing input/output bins
- ORIENTATION (numerical value)
- 0: Portrait
- 1: Landscape
- 2: ReversePortrait 3: ReverseLandscape
COPY (numerical value): number of copies
STAPLE (numerical value)
- 1 = SaddleStitch (staples in the middle of the page)
- 2 = StapleBottomLeft (bottom left stapling)
- 3 = StapleBottomRight (bottom right stapling)
- 4 = StapleDualBottom (bottom stapling)
- 5 = StapleDualLeft (left stapling)
- 6 = StapleDualRight (right stapling)
- 7 = StapleDualTop (top stapling)
- 8 = StapleTopLeft (top left stapling)
- 9 = StapleTopRight (top right stapling)
- 10 = None (stop stapling)
MEDIATYPE (alphabetical value): type of paper Examples: Archival, Label, Bristol, AutoSelect…
NUP (numerical value: 1, 2 or 4): merging 1, 2 or 4 pages of the initial document on 1 output page
LEFTOFFSET: left offset in dots
TOPOFFSET: top offset in dots
JOBCUT: yes/no. Command used to implement breaks in jobs (to use the utility knife on printers that have one)
TOGGLE: yes/no. Command used to move the paper.
Note:
All these parameters will then need to be managed in conversion profiles of the XPSConfig.conf file depending on the final form of the documents. You can also use these parameters when converting directly without using the -set : -duplex:LONG instead of -set:DUPLEX=LONG.
Examples :
- To configure the simplex/duplex on an existing XPS file:
map_xps -infile:/home/map2019/myfile.xps -set:DUPLEX=yes
- To configure only the simplex on an existing XPS file:
map_xps -infile:/home/map2019/myfile.xps -set:DUPLEX=no
- to manage PrintTickets at page level:
map_xps -infile:/home/map2019/email.xps -set:INPUTBIN=2 -pages:2,3
- To configure the duplexon the first page and the simplex/duplex on the following ones:
 map_xps -infile:/home/map2019/myfile.xps -set:DUPLEX=yes
 map_xps -infile:/home/map2019/myfile.xps -set:DUPLEX=no -pages:1
Sending an e-mail
Sending resulting files by e-mail after running the map_xps command.
Required parameters:
-toEmail | -toMail
-server:XXX => SMTP server
-from:XXX	=> sender
-to:XXX	=> recipient(s)
-infile:XXX => XPS file to attach in the e-mail
Optional parameters (whether an argument listed below is optional or not may depend on the SMTP server) :
-domain:mydomain.net	=> SMTP server domain
-port:25	=> SMTP server port
-login:username	=> login for the SMTP server
-passwd:*******	=> password for the SMTP server
-cc:XXX	=> carbon copy recipient(s)
-bcc:XXX	=> blind carbon copy recipient(s)
"-subject:This is my subject" => subject of the e-mail
"-body:This is my body"	=> body of the e-mail in text format
-bodyhtml:XXX	=> body of the e-mail in HTML format
-bodyhtml:FILE:/home/izaopale/bodyhtml.html
-footer:XXX	=> E-mail footer in text format
-footerhtml:XXX	=> e-mail format in HTML format
-footerhtml:FILE=/home/izaopale/footer.html
-attachment:XXX	=> additional attachments, separated by a comma
-outfile:XXX	=> If the e-mail is sent, this argument allows you to give a name to the main attachment (infile argument) sent
Example 1:
map_xps -infile:/home/map2019/file.xps -toMail -from:XXX -to:XXX -login:XXX -passwd:XXX -server:XXX "-subject:e-mail test" "-body:This is a test" -outfile:namePJ.xps
Example 2: with 2 additional attachments
map_xps -infile:/home/map2019/file.xps -toMail -from:XXX -to:XXX -login:XXX -passwd:XXX -server:XXX "-subject:E-mail test" "-body:This is a test" -outfile:namePJ.xps -attachment:/home/izaopale/PJ1.pdf,/home/izaopale/PJ2.pdf
Example 3: the attachment is converted to PDF
map_xps -infile:/home/map2019/file.xps -toMail -from:XXX -to:XXX -login:XXX -passwd:XXX -server:XXX "-subject:E-mail test" "-body:This is a test" -toPDF -outfile:namePJ.pdf
Mapping and printing – Redirecting to an OUTQ
The document is mapped and implicitly/explicitly converted in output
Output languages supported when running the MAPCPYSPLF are: o Parameter TYPLAN:
- PCL
- AFPDS
- ZEBRA
- DATAMAX
- AUTO
- IGP
- TEC
- IPL
- F_D
- EPL
- XPS
The value *AUTO uses the value of the parameter entered in option 1 of the Mapping Menu.
In this case, if *AUTO is specified in the TYPLAN parameter of the software command, the software will use the templates generated in PCL language.
o XPSCONVERT parameter:
Value Note
- AUTO Value of 14/14 - PROFILE Parameter
Value of profile Profile specified in XPSConfig.conf
The value *AUTO retrieves the profile name of the printer which is configured in option Defining printer parameters of the Operations Menu.
Definition example:
In this example, the *PCL profile is specified for all printers. This means you will not have to specify the name of all Outqs / Devices of the system if physical printers are laser printers.
This profile name must be configured in the XPSConfig.conf file (located in the IFS, under the root of the MAPPING folder).
A configuration file is installed by default with the following values:
<xpsconfig>
- This file contains the conversion profile for Mapping.
- You can create your own profile based on the Mapping documentation. BE CAREFUL WITH THE FILE STRUCTURE.
- PROFILE NAMES STARTING WITH * ARE RESERVED FOR MAPPING. SO DO NOT CREATE OR MODIFY A PROFILE STARTING WITH *.
	<*XPS>
	 	<label>DO NOT MODIFY - standard XPS</label>
	 	<language>XPS</language>
	</*XPS>
	<*PCL>
	 	<label>DO NOT MODIFY - standard PCL5/e</label>
	 	<language>PCL</language>
	 	<color>off</color>
	</*PCL>
In this example, the *PCL profile uses PCL language (<language> parameter of the profile).
Example of commands for printed output:
 MAPCPYSPLF SPLF(SPOOL) SPLNUM(7) JOB(QPADEV003K) JOBNUM(062592) USER(XXX)
 MAPNAM(INVOICEXPS) MAPSEQ(00010) OUTQ(PCLPRT) TYPLAN(*XPS) XPSCONVERT(*AUTO)
Explanation:
TYPLAN: This is used to choose the language for the template. This parameter can also be set to value *AUTO, in which case the program retrieves the value chosen in Option 1 of the Mapping Menu.
XPSCONVERT: Converted implicitly in output. With this parameter set to *AUTO the profile used is the one configured in Option 6 of the Operations Menu.
Another example:
MAPCPYSPLF SPLF(SPOOL) SPLNUM(7) JOB(QPADEV003K) JOBNUM(062592) USER(XXX)
MAPNAM(INVOICEXPS) MAPSEQ(00010) OUTQ(PCLPRT) TYPLAN(*XPS) XPSCONVERT(*PCL)
Explanation:
XPSCONVERT: Converted explicitly in output. With *PCL, the *PCL profile of the XPSConfig.conf file will be used here.
Mapping with an output file placed in the IFS /Mapping the document, converting and storing it in the IFS
The same commands can be used to place the converted mapping output in the IFS. What you need to do is fill-in the XPSOUTFILE parameter. The default value of XPSOUTFILE is set to *PRINT, so as not to generate any output file.
Example:
MAPCPYSPLF SPLF(SPOOL) SPLNUM(7) JOB(QPADEV003K) JOBNUM(062592) USER(XXX)
MAPNAM(INVOICEXPS) MAPSEQ(00010) OUTQ(PCLPRT) TYPLAN(*XPS) XPSCONVERT(*PCL) XPSOUTFILE(‘/home/map2019/invoice.pcl’)
Transferring the log in a file
This retrieves all map_xps command logs in a text file.
Example:
map_xps -infile:/home/map2019/email.xps –logfile:/tmp/mylog.log
Listing the resources
This displays all the resources (fonts and images) compiled in an XPS file.
Example:
map_xps -infile:/home/map2019/email.xps –listResource
Extracting pages
This defines intervals and/or selected pages to process. Page intervals need to be specified in the command line, selected pages can be specified by using directly the path of the text file their are compiled in, in this case the syntax is: page number+CRLF. Using the ‘*’ character to set intervals indicates the end of the document.
Examples:
map_xps -infile:/home/map2019/email.xps -outfile:/home/map2019/email.pdf -pages:1,3,4,7,10 –toPDF
map_xps -infile:/home/map2019/email.xps -outfile:/home/map2019/email.pdf -pages:3-10 –toPDF
map_xps -infile:/home/map2019/email.xps -outfile:/home/map2019/email.pdf -pages:1,5,10-* –toPDF
map_xps -infile:/home/map2019/email.xps -outfile:/home/map2019/email.pdf -pages:FILE:/home/map2019/test.txt –toPDF
Extracting XML data (in Designer)
This creates an XML file which is compatible with Designer and in which all the text data of the XPS file is processed. Every text zone of the XPS file becomes an XML field, designated by its XY coordinates. These coordinates are defined in 72 dpi.
This is also used to create an XML file to add OMR marks.
Example :
map_xps -infile:/home/map2019/billing.xps –toXMLDRAW -outfile:/home/map2019/billing.draw.xml
Formats and size of a document's pages:
To edit the size of a document's pages, or the size of the data inside a page, 3 arguments of the command line are used:
-paper:XXX:changes the size of the paper (page), without changing the content.
-scale:XXX: changes the size of the content, without changing the paper.
-changeformat:XXX: changes the document format by changing the size of the paper while also adjusting the content (keeps proportions).
Syntaxes
To put the content of a page to scale, the "-scale:XXX" argument needs to be set using percentage values from 0 to infinity (be careful data losses can occur for values above 100 because the size of the paper is not changed).
To change the size of the output paper, whether you also edit the content or not, the « - changeformat:XXX » and « -paper:XXX » arguments are used to define the size of the format, with ISO standards or costumed settings.
Possible values ISO: AUTO, EXECUTIVE, LETTER, LEGAL, LEDGER, A4, A3, A2, A1, A0, MONARCH, COM10, DL, CS, B5 Syntax for custom size: -changeformat:xx.xx,xx.xx[,cm|in|mm] 2 decimal values, respectively the length and height. The dot is the decimal delimiter. The comma or semi-colon is the values delimiter.
The unit is optional: cm (by default), mm ou in Examples :
map_xps -infile:/home/map2019/billing.xps –scale:50 -outfile:/home/izaopale/out.xps
map_xps -infile:/home/map2019/billing.xps –changeformat:A4 -outfile:/home/izaopale/out.xps
map_xps -infile:/home/map2019/billing.xps –changeformat:21,29.7,cm -outfile:/home/izaopale/out.xps
Rotating documents
This rotates the content of an XPS file
The rotation angle (in degrees) is specified in the command line, the rotation goes in anticlockwise direction by default. All rotation angles are technically supported, however right angles are the only ones that respect the coherence of the original page dimensions.
Supported values: -90 (90° clockwise rotation), 90, 180, 270. Note: -180 and -270 are not supported values (blank page in output), use 180 and 90.
Example:
map_xps -infile:/home/map2019/file.xps -outfile:/home/map2019/file_90.xps –rotation:90 -toXPS
Adding an overlay to an existing document
You can add another document as an overlay or layer to an existing XPS document. For instance: adding a logo on an existing invoice that does not have one.
The optional argument "-mergemode:XXX" allows you to adjust the additional overlay in a more detailed way.
Example:
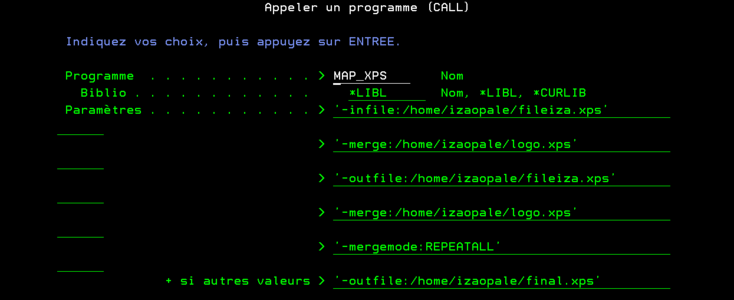
map_xps -infile:/home/map2019/billing.xps -merge:/home/map2019/logo.xps -mergemode:REPEATALL -outfile:/home/map2019/final.xps
The "-merge:XXX" argument specifies the name of the file to add as overlay onto the input document. The "-mergemode:XXX" argument specifies the method used to add the overlay:
REPEATALL: all pages are merged together and the overlay is added onto every page until the end of the input file. If nothing specifies otherwise, this is the default setting.
Example:
- Input: input file with 5 pages (marked as 1,2,3,4,5) and an overlay with 2 pages (marked as a,b)
- Output: a file with 5 pages marked as 1a,2b,3a,4b,5a
REPEATFULL: all pages are merged together and the overlay is added onto every page as long as it can be entirely inserted.
Example:
- Using the same input we used before, this argument will give us a file with 5 pages marked as 1a,2b,3a,4b,5 (the last page is not edited)
ONCE: the overlay is only added once on the first page(s) of the input file.
Example:
- Using the same input we used before, this argument will give us a file with 5 pages markes as 1a,2b,3,4,5.
Environnement variable exported
MAP_XPSFILE: contains the name of the file being extracted.
Managing input boxes
Name of the zone to input text needs to be "SUBMIT".
-param:url=http://127.0.0.1:8002/cgi-bin/mapsoapserver.exe/mapRunPost?
map_xps -infile:/tmp/form_empty.xps -outfile:/tmp/test.pdf -toPDF
-param:url=http://127.0.0.1:8002/cgi-bin/mapsoapserver.exe/mapRunPost?
map_xps -infile:/tmp/form_empty.xps -outfile:/tmp/test.html -toHTML
-param:url=http://127.0.0.1:8002/cgi-bin/mapsoapserver.exe/mapRunPost?
To send an e-mail with it:
map_xps -infile:/tmp/form_empty.xps -outfile:/tmp/test.html -toHTML
-param:url=http://127.0.0.1:8002/cgi-bin/mapsoapserver.exe/mapRunPost? -toMail -from:exp@mydomain.net -to:dest@mydomain.net
-subject:form -server:192.168.1.2 -domain:mydomain.net


