ONYX - 9.0 - Utilisation - Convertisseurs de sortie/en
Différence entre versions
| Ligne 1 : | Ligne 1 : | ||
<languages/> | <languages/> | ||
{{:ONYX:9.0:Utilisation:Généralité du XPSConfig/en}} | {{:ONYX:9.0:Utilisation:Généralité du XPSConfig/en}} | ||
| − | {{:ONYX:9.0:Utilisation:XPSConfig et conversion PCL}} | + | {{:ONYX:9.0:Utilisation:XPSConfig et conversion PCL/en}} |
{{:ONYX:9.0:Utilisation:XPSConfig et conversion PDF}} | {{:ONYX:9.0:Utilisation:XPSConfig et conversion PDF}} | ||
{{:ONYX:9.0:Utilisation:XPSConfig et conversion AFPDS}} | {{:ONYX:9.0:Utilisation:XPSConfig et conversion AFPDS}} | ||
Version du 2 janvier 2025 à 15:49
<language/>
Sommaire
- 1 The configuration file: xpsConfig.conf
- 2 Conversion to PCL5
- 3 Conversion en PDF
- 4 Conversion en AFPDS
- 5 Conversion en HTML
- 6 Conversion en Docx
- 7 Conversion en image
- 8 Conversion en ESCP
- 9 Conversion en ZEBRA
- 10 Conversion en ELTRON
- 11 Conversion en TEC
- 12 Conversion en MONARCH
- 13 Conversion en IGP
- 14 Conversion en DATAMAX(DPL)
The configuration file: xpsConfig.conf
Definition
All conversions from the pivot XPS format to the destination languages are handled natively in the engine. They are defined and refined by different fully configurable conversion profiles and stored in a configuration file called XPSConfig.conf. Physically, this file is located in the folder defined by the XPSCONFIG configuration variable.
Example on Windows:
[XPSCONFIG] C:\Program Files\M-Processing Server\Settings\XPSConfig.conf
Example on Linux:
[XPSCONFIG] /apps/mapping/conf/XPSConfig.conf
Structure and syntax
The general structure of the XPSConfig.conf file is based on XML syntax:
<xpsconfig>
  <profile_1>
         <param_1>valeur</param_1>
         <param_2>valeur</param_2>
         <param_3>valeur</param_3>
          …
   </profile_1>
   <profile_2>
           <param_1>valeur</param_1>
           <param_2>valeur</param_2>
           …
   </profile_2>
           …
</xpsconfig>
As many conversion profiles as necessary can be declared depending on the different input/output channels of production documents. Each profile must have a unique name which will be used by Spooler Mapping or on the command line to identify the correct conversion profile. For each profile, all the useful parameters allowing the conversion to be carried out, refined and optimized are provided.
Important:
All information contained in this configuration file is case sensitive: name of the different profiles, names and values of the parameters.
Note:
All parameters documented below can also be used on the command line and can be overridden when calling a map_xps conversion command. The syntax for calling a particular parameter is then: -param:parameter_name=value.
Generic parameters
Some parameters are generic and can be used in all profiles regardless of the conversion language.
Language
This first parameter is required for all profiles. It defines the output language of the conversion.
The syntax in the profile is:<language>PCL</language>
Here is the list of all output formats supported by ONYX Server:
- XPS (default language if not specified in the profile)
- Print languages:
- PCL
- ZEBRA
- AFPDS
- PGI
- PS (PostScript)
- TEC
- PROPRINTER
- EPL
- ESCP
- MONARCH
- XMLPOS
- DPL (Datamax)
- DB4
- Web languages:
- HTML
- RTF
- DOCX
- TXT
- ONYX Server outputs:
MAPDRAW (used for importing XPS assets into M-Designer)
- Image outputs:
IMAGE
BMP
Label
This optional parameter allows you to give a user description to the profile. This description will be used in particular in the ONYX Server Spooler for configuring print queues (XPS compatibility parameter).
The syntax in the profile is:<label>PCL5 printing in black and white</label>
Color
This optional parameter allows you to activate or deactivate color conversion for destinations that support it. When this parameter is not specified in the profile, the principle is to respect a conversion faithful to the original XPS document. So, for destinations that support it, color conversion is enabled by default.
The syntax in the profile is: <color>on</color>
Supported values: ON/OFF, on/off, YES/NO, yes/no, 0/1
Default value: ON, except for the AFPDS language.
For languages that support it, ICC (International Color Consortium) color profiles are also supported, with the syntax: <outputICC>path_to_ICC_file</outputICC>
Code page
This optional parameter allows you to define the output code page for destinations that support it.
The syntax in the profile is:<codepage>850</codepage>
Supported values: depending on the output language
Default value: dependent on output language
Resolution
This optional parameter allows you to define the output resolution of the document expressed in dpi (dots per inch). The syntax in the profile is:<resolution>240</resolution>
Supported values: 200, 300, 600....
Default value: that of the defined output language
For destinations that support it, the resolution (in dpi) of the document images can also be specified with the syntax: <resolutionimage>240</resolutionimage>
Supported values: 203, 300, 600…
Default value: that of the defined output language
Rotation
This optional parameter allows you to define the rotation angle (anti-clockwise or trigonometric) of the output pages. The syntax in the profile is:<pagerotation>90</pagerotation>
Supported values: 0, 90, 180, 270
Default value: 0 (no rotation)
Paper Size
This optional parameter allows you to modify the format of the output pages. The size of the pages as well as the content will be recalculated.
The syntax in the profile is:<changeformat>Letter</changeformat>
Supported ISO standard values: A2, A3, A3 Extra, A4, A4 Plus, A4 Extra, A5, A5 Extra, A6, B4, B5, B5 Extra, B6, Envelope #9, Envelope #10 , Envelope #11, Envelope #12, Envelope #14, Envelope B4, Envelope B5, Envelope B6, Envelope C3, Envelope C4, Envelope C5, Envelope C6, Envelope C65, Envelope DL, Envelope Invite, Envelope Monarch, Envelope, Executive, Folio, German Legal Fanfold, German Std Fanfold, Japanese Postcard, Japanese Double Postcard, Ledger, Legal, Legal Extra, Letter , Letter Extra, Letter Plus, Letter Small, Note,PRC 16K, PRC 32K, PRC 32K(Big), PRC Envelope #1, PRC Envelope #2, PRC Envelope #3, PRC Envelope #4, PRC Envelope #5, PRC Envelope #6, PRC Envelope #7, PRC Envelope #8, PRC Envelope #9, PRC Envelope #10, Quarto, Statement, SuperA, SuperB, Tabloid, Tabloid Extra, US Std Fanfold.
Custom values are also supported, with the syntax:<changeformat>xx.xx,xx.xx[,cm|in|mm]</changeformat>
- two decimal values, separated by a comma corresponding to width and height respectively
- The decimal separator is ‘.’
- The unit is optional: cm (default), mm or in (for inch)
- The brackets should be removed (they symbolize the optional aspect)
Image output
This optional parameter allows conversion to image mode, for languages that support it. The size of the flows is not optimal but the rendering of all elements is thus guaranteed.
The syntax in the profile is:<fullimage>on</fullimage>
Supported values: ON/OFF, on/off, YES/NO, yes/no, 0/1
Default value: off
Interval between 2 labels
This optional parameter allows you to define, for thermal languages, the distance between two labels. The value is expressed in points. The syntax in the profile is:<gap>24</gap>
Page offset
These optional parameters allow you to shift all the pages of a document without changing the margins. Values are expressed in 96dpi and are decimal. The syntax in the profile is:
<XpsTopOffset>10.2</XpsTopOffset>
<XpsLeftOffset>8.1</XpsLeftOffset>
Image resizing quality
This optional parameter allows you to improve the quality of image resizing in order to make it more precise. The syntax in the profile is:<precisemode>on</precisemode>
Supported values: ON/OFF, on/off, YES/NO, yes/no, 0/1
Default value: off
Font management
The XPS document contains all the resources necessary for its display including, in particular, the fonts used in ODTTF format. In conversion to an output language, the choice is possible whether or not to embed the fonts in the flow. This choice will depend on the languages and printing equipment.
Embedded fonts
This optional parameter allows you to activate or deactivate the incorporation of fonts in the final document. When this setting is enabled, the fonts used in the XPS document will be embedded in the output stream and therefore sent to the printer. Otherwise, the printer's resident fonts will be used for printing. When this parameter is not specified, it is enabled by default. The syntax in the profile is: <embeddedfont>ON</embeddedfont>
Supported values: ON/OFF
Default value: ON (except for AFPDS, PS and RTF languages)
When this setting is disabled, another setting allows you to force the use of a default resident font for any undeclared XPS font (see below). The syntax in the profile is:<defaultfont>1</defaultfont>
Supported values: from 1 to n, identifying the number of the font match to use by default in the profile.
Default value: 1
Resident fonts
When the previous setting is disabled, it is necessary to predict the correspondence between the fonts of the XPS document and those to be used on the printer. This correspondence table is constructed in the profile with the following syntax:
<fonts>
          <font name="Arial" size="10" height="100" italic="0" bold="0" zoomx="1" zoomy="1" codeFont="4" />
          <font name="Tahoma" size="10" height="100" italic="0" bold="0" zoomx="1" zoomy="1" codeFont="A" />
          …
          </fonts>
In this table, between one and five parameters are used to identify XPS fonts:
- name = XPS font name (required)
- size = size in points of the font (optional)
- height = height or vertical deformation in percentage (optional)
- italic = italicized font or not (optional)
- bold = bold font or not (optional)
Then between one and five parameters are used to identify the resident font that should be called:
- codeFont = resident font number to use for printing (required). The values depend on the printing language and printer model and are generally given by the printer manufacturer.
Examples:
- for a Zebra printer, the values go from A to Z, or from 1 to 9
- for an Eltron printer, the values range from 1 to 5
- zoomx = size to width multiplication factor (optional)
- zoomy = size-height multiplication factor (optional)
- type = resident font type (bitmap or vector) in TEC language (optional)
- fgid = AFP font identifier (optional)
1D barcode management
Since 1D barcodes are also rendered by fonts, the same choice as above is possible depending on the languages and printing equipment.
Onboard or resident barcode
This optional parameter allows, for thermal languages and AFPDS, to activate or deactivate the rendering of 1D barcodes by the printers themselves. When this setting is enabled, barcode printing is handled by the printer using its resident fonts. Otherwise, the fonts used in the XPS document will be embedded in the flow and therefore sent to the printer. When this parameter is not specified, it is activated by default.
The syntax in the profile is:<barcode>PRINTER</barcode>
Supported values: IMG, FONT, PRINTER
Default value: PRINTER
IMG: embedded as an image
FONT: embedded as a font
PRINTER: the barcode is generated by the printer
Printer rendering
When the previous setting is activated, it is necessary to predict the correspondence between the fonts of the XPS document and those to be used on the printer. This correspondence table is constructed in the profile with the following syntax:
<barcodes>
<barcode type="21" size="35" height="200" bcheight="40" bcwidth="A,B" />
…
</barcodes>
In this table, three parameters are used to identify XPS fonts:
- type = barcode type (see table below)
- size = size in points of the font
- height = height or vertical deformation in percentage
Then two parameters are used to customize the physical dimensions of a barcode when printed:
- bcheight = desired height of the barcode (in points)
- bcwidth = desired width of the barcode, specifying for example the width of a thin element and the ratio between thin and thick element
The syntax and values of these two parameters depend on the final printing language and the type of barcode. List of barcodes supported by ONYX Server, with their type:
| 2 | PDF 417 |
| 11 | Data Matrix |
| 12 | QR Code |
| 14 | MaxiCode |
| 17 | EAN 13 |
| 18 | EAN 8 |
| 19 | Code 39 |
| 20 | Code 39 No check |
| 21 | Code 128 alpha optimzed |
| 22 | Code 128 alpha non optimized |
| 23 | Code 128 Numeric |
| 24 | 2 Among 5 Interlaced |
| 25 | 2 Among 5 Interlaced No Check |
| 26 | 2 Among 5 industrial |
| 27 | 2 Among 5 industrial No ckeck |
| 28 | EAN 128 alpha non optimized |
| 29 | EAN 128 numéric |
| 30 | EAN 128 alpha optimized |
| 31 | Postnet |
| 32 | Planet |
| 35 | Native |
| 77 | Japan Postal |
| 78 | Codabar |
| 79 | USPS |
| 80 | UPC-A |
| 81 | UPC-E |
| 82 | MSI |
| 83 | MSI 2 mod. 10 |
| 84 | MSI mod. 11 |
| 85 | MSI mod. 11 mod. 10 |
| 86 | MSI no check |
Conversion to PCL5
Language tag
To configure the conversion profile for XPS to PCL conversion, you must set the language parameter to PCL <language>PCL</language>
Input/output bin management
This involves defining a correspondence table between a logical code (numerical value) applied in the XPS document and the PCL code of the destination printer tray. The syntax in the profile is:
<inputbin>
       <bin from="1" to="8" />
       <bin from="2" to="1" />
       <bin from="3" to="2" />
</inputbin>
<outputbin>
       <bin from="5" to="2" />
       <bin from="7" to="3" />
</outputbin>
Caution :
The logical codes (which can, for example, represent the geographical location of the bins on the printer) can be the same from one printer to another. These are 'user' values and the PCL codes are specific to each printer. They can vary from one manufacturer to another and sometimes even from one printer model to another for the same brand.
Paper type management
Here again, it is a correspondence table between a logical value (user) and a PCL code (hardware dependent) corresponding to the desired paper format.
Management at Print Job level : To add a MEDIATYPE sequence to an XPS file, you can run the following command:
"[%PATH_BIN%]/map_xps" "-infile:[%MAP_FILE_IN%]" "-set:MEDIATYPE=Header_Paper" "-outfile:[%MAP_FILE_OUT%]"
<mediatype>
       <type from="Letterhead" to="Letterhead" />
       <type from="Preprinted" to="Preprinted" />
       <type from="Normal paper" to="Plain" />
</mediatype>
In the generated PCL flow, the information will be positioned in a PJL sequence at the start of the print job: @PJL SET MEDIATYPE=Preprinted
Management at Document or Page level :
<mediatype mode="AlphanumericID">
       <type from="Letterhead" to="Letterhead" />
       <type from="Preprinted" to="Preprinted" />
       <type from="Normal paper" to="Plain" />
</mediatype>
In the generated PCL flow, the information will be positioned in PCL sequences for each document (or for each page) of the print job. Example: &n11WdPreprinted.
Management of printing margins
Two parameters, expressed in points (based on a resolution of 300 dpi) allow you to adjust the horizontal (X) and vertical (Y) printing margins. This corresponds to the actual printer margins.
<marginx>78</marginx>
<marginy>0</marginy>
Default values: 78 for marginx and 0 for marginy. That is to say 0.66cm for the marginx and 0cm for the marginy, corresponding to the default margins of PCL printers.
Stapling management
New correspondence table between a stapling type defined in the XPS document and the PCL/PJL code which will be inserted in the final document to control the stapling equipment.
The syntax in the profile is:
<stapling>
        <staple from="SaddleStitch" to="@PJL SET STAPLE=ON" />
        <staple from="StapleBottomLeft" to="@PJL SET STAPLE=ON" />
        …
</stapling>
Supported stapling types:
| SaddleStitch | stitched binding |
| StapleBottomLeft | staple bottom left |
| StapleBottomRight | staple bottom right |
| StapleDualBottom | staple at bottom |
| StapleDualLeft | left stapling |
| StapleDualRight | right stapling |
| StapleDualTop | staple on top |
| StapleTopLeft | staple top left |
| StapleTopRight | staple top right |
Image management
Sharing of resources
To optimize the size of the converted stream, a first parameter allows you to manage the background images as a resource in the document. Images common to several pages are only present once in the final PCL.
The syntax in the profile is:<imageresource>ON</imageresource>
Supported values: ON/OFF, on/off, YES/NO, yes/no, 0/1
Image compression
Still with the aim of optimizing the size of the streams, several output image compression algorithms are implemented and can be used in the profiles:<RasterCompressionMethod>Raw</RasterCompressionMethod>
Supported values:
- Raw: Raw mode, without optimization or compression. This mode is not recommended in production, but it does allow you to validate the interpretation of the input image stream.
- RLE: Run Length Encoding mode. This method is recommended for images with a high rate of identical colors. On the other hand, it is strongly not recommended for images with color gradients.
- TIFF: Enhanced RLE mode. This versatile method mixes the two previous ones, thus avoiding wasting space on gradients in particular.
- DeltaRow: Row difference mode. This method uses the previous line to describe the next line and therefore only encodes the differences. Optimal method in most cases.
- Adaptive: Adaptive mode. This method detects among the previous ones which method is the best for each of the lines of the image to be encoded.
- Dynamic: Improved version of Adaptive mode for very large images, especially in combination with the fullimage setting ON.
Filling management
For black and white output only, the following parameter allows you to use the fill patterns generated in the XPS (= true), or those of the printer (= false): <uploadPattern>true</ uploadPattern>
<translate>
Conversion en PDF
Cette page explique comment utiliser un profil de conversion XPS vers PDF pour paramétrer le type de sortie PDF attendu, ainsi que la signature électronique et les différentes options de protection.
Balise Language
Pour paramétrer le profil de conversion XPS vers PDF, il faut mettre le paramètre language à PDF :
<language>PDF</language>
Sortie PDF/A
Le paramètre suivant permet d’activer une sortie PDF/A conforme à la norme :
<pdfa>on</pdfa>
Ce paramètre est à off par défaut
Lorsque ce paramètre <pdfa> est activé, le paramètre suivant permet de spécifier une autre version PDF/A.
<pdfaversion>1b</pdfaversion>
Les valeurs possibles sont les suivantes :
- 1b (par défaut, pour PDF/A-1b)
- 2b (pour PDF/A-2b)
- 2u (pour PDF/A-2u)
- 3b (pour PDF/A-3b)
Signature électronique
L’ensemble des paramètres suivants permettent d’apposer une signature électronique aux documents PDF en sortie d'ONYX Server :
<signclass>3</signclass>
<signmode>FILENAME</signmode>
<signpassword>test</signpassword>
<signdriver>OPENSSL</signdriver>
<signsha1hash>3eb783643e522c81d1e34c1943e6f4163e9ad439</signsha1hash>
<signpemfile>C:\tmp\test.pem</signpemfile>
<signcerfile>C:\tmp\test.cer</signcerfile>
<signpfxfile>C:\tmp\valid.pfx</signpfxfile>
<timestampurl>http://servertemp.domain/tsp</timestampurl>
Par défaut, les documents PDF produits par ONYX Server ne sont pas signés.
Protection des PDF
L’ensemble des paramètres suivants permettent de piloter les différentes protections des documents PDF produits en sortie d'ONYX Server :
<encryptmode>on</encryptmode>
<encryptuserpwd>mapadmin</encryptuserpwd>
<encryptownerpwd>********</encryptownerpwd>
<encryptallowall>on</encryptallowall>
<encryptallowprint>on</encryptallowprint>
<encryptallowmodify>on</encryptallowmodify>
<encryptallowdataextraction>on</encryptallowdataextraction>
<encryptallowcomment>on</encryptallowcomment>
<encryptallowsignature>on</encryptallowsignature>
<encryptallowaccessibility>on</encryptallowaccessibility>
<encryptallowassemble>on</encryptallowassemble>
<encryptallowhightlevel>on</encryptallowhightlevel>
Par défaut, les documents PDF produits par ONYX Server ne sont pas protégés. </translate>
Conversion en AFPDS
Balise Language
Pour paramétrer le profil de conversion en conversion XPS to AFPDS, il faut mettre le paramètre language à AFPDS <language>AFPDS</language>
Gestion des polices
Le paramètre <allcodepage>on</allcodepage> permet d’activer la conversion en mode Font Collection. Si les polices résidentes sont préférées, les correspondances seront déclarées suivant la syntaxe suivante :
<fonts>
                <font name=”Times New Roman” size=”12” italic=”0” bold=”0” codeFont=”C0N20460” />
                <font name=”Courier New” size=”12” italic=”0” bold=”1” codeFont=”C0N20460” fgid=”416” />
                …
          </fonts>
Pour les valeurs du fgid se rendre sur http://publib.boulder.ibm.com/iseries/v5r2/ic2924/books/c415713531.htm
Autres paramètres
Les flux AFPDS peuvent être indexés, les index du document XPS étant convertis en TLE. Le paramètre suivant active cette conversion des index :<tle>on</tle>
Valeurs supportées : ON/OFF, on/off, YES/NO, yes/no, 0/1
Certaines imprimantes matricielles sont compatibles avec le langage AFPDS. Le paramètre suivant permet d’activer cette compatibilité en conversion :<dotmatrix>on</dotmatrix>
Valeurs supportées : ON/OFF, on/off, YES/NO, yes/no, 0/1
Conversion en HTML
Génération d’émail
Le paramètre optionnel suivant permet de générer un fichier compatible pour l’envoi d’emails. La syntaxe dans le profil est :<email>on</email>
Exemple d'utilisation :
map_xps “-infile:/tmp/invoice.xps” “-outfile:/tmp/invoice.mime” -toHTML “-param:email=on”
map_mail “-server:smtp.mydomain.net” “-domain:mydomain.net” “-from:myname@mydomain.net”
      “-to:anonymous@mydomain.net” “-subject:my mail” “-file_name:/tmp/mail.mime”
      "-attachment_name:multipart/related"
Conversion en Docx
Balise Language
Pour paramétrer le profil de conversion en conversion XPS to DOCX, il faut mettre le paramètre language à DOCX <language>DOCX</language>
Gestion des polices
La table suivante permet de lister l’ensemble des polices à ne pas embarquer dans le document final :
<nonembeddedfont>

       …
</nonembeddedfont>
Gestion des marges
La table suivante permet de définir les marges souhaitées dans le document final :
<margin>
       <top>10</top>
       <bottom>10</bottom>
       <left>25</left>
       <right>25</right>
</margin>
Les valeurs des marges sont exprimées en millimètres.
Conversion en image
<format>BMP</format>
Permet de définir le format de l’image de sortie.
Valeurs supportées : JPEG, PCX, BMP, PNG, TIFF
Valeur par défaut : BMP
<quality>80</quality>
Taux de respect de qualité de l’image pour le format JPEG.
Valeurs supportées : de 0 à 100, en pourcentage
Conversion en ESCP
<version>ESCP2</version>
Version du langage à utiliser.
Valeurs supportées : ESCP1, ESCP2, ESCP9PIN, ESCPFX
Valeur par défaut : ESCPFX
<model>INFOPRINT_XL</model>
Permet de définir le modèle de l’imprimante (utilisé pour le codage des codes à barre).
Valeurs supportées INFOPRINT_XL, ESCP
Valeur par défaut : ESCP
<cut>0</cut>
Activation ou non du cutter.
Valeurs supportées: ON/OFF, on/off, YES/NO, yes/no, 0/1
<translate>
Conversion en ZEBRA
Balise Language
Pour paramétrer le profil de conversion en conversion XPS to ZEBRA, il faut mettre le paramètre language à ZEBRA
<language>ZEBRA</language>
Résolution
Pour changer la résolution du flux ZEBRA en sortie, il faut utiliser la balise resolution
<resolution>203</resolution>
Paramétrage sur les polices
Utilisation des polices textes résidentes
Afin d'alléger le flux ZEBRA généré, il est possible de ne pas inclure dans le flux les polices. Pour ce faire, il faudra utiliser la balise fonts.
Exemple :
 <fonts>
   <font name="Arial" italic="0" bold="0" codeFont="I"/>
   <font name="Arial" italic="0" bold="1" codeFont="J"/>
 </fonts>
Dans notre exemple ci-dessus, si dans la maquette Designer construisant le flux XPS, nous avons :
- Arial , Non Gras alors on aura dans le flux la police I
- Arial , Gras alors on aura dans le flux la police J
Cas des codes à barre
Balise barcode
e paramètre, optionnel, permet, pour les langages thermiques et l’AFPDS, d’activer ou de désactiver le rendu des codes-barres 1D par les imprimantes elles-mêmes. Lorsque ce paramètre est activé, l’impression des codes-barres est gérée par l’imprimante en utilisant ses polices résidentes. Sinon, les polices utilisées dans le document XPS seront embarquées dans le flux et donc envoyées à l’imprimante. Lorsque ce paramètre n’est pas renseigné, il est activé par défaut.
La syntaxe dans le profil est :<barcode>PRINTER</barcode>
Valeurs supportées : IMG, FONT, PRINTER
Valeur par défaut : PRINTER
IMG : embarqué sous forme d'image
FONT : embarqué sous forme de police
PRINTER : le code barre est généré par l'imprimante
Pour des raisons de rétrocompatibilités, les valeurs suivantes sont également possible :
- ON (on, YES, yes, 1) : La police n'est pas embarquée dans le flux
- OFF (off, NO, no, 0) : La police est embarquée dans le flux
Personnalisation de la taille des codes-barres
- bcheight : hauteur désirée du code barre en points.
- bcwidth : série de deux valeurs séparées par une virgule, correspondant respectivement à :
- la largeur d’un élément fin en points
- le ratio entre un élément fin et un élément épais
Exemple :
<barcodes>
        <barcode type="19" height="100" size="46" bcheight="55" bcwidth="3,2.6" />
</barcodes>
Signifie qu'un code barre Code39 (type 19), avec une taille de police de 46 et une déformation verticale de 100%, sera imprimé en Zebra par un code barre résident de 55 points de haut, avec une barre fine de 3 points, et un ratio barres fines/barres épaisses de 2.6.
Gestion de la découpe
<cutter config="MMT" cmd="MMC" /> Activation du couteau en fin d’impression </translate>
Exemple de XPSConfig.conf
<zebra>
   <label>Zebra</label>
   <language>ZEBRA</language>
   <resolution>300</resolution>
   <fonts>
     <font name="Arial" italic="0" bold="0" codeFont="0" />
     <font name="Arial" italic="0" bold="1" codeFont="0" />
   </fonts>
   <barcode>PRINTER</barcode>
   <barcodes>
    <barcode type="80" height="100" size="56" bcheight="200" bcwidth="2,2.0" />
    <barcode type="80" height="100" size="54" bcheight="250" bcwidth="3,2.1" />
    <barcode type="80" height="100" size="55" bcheight="150" bcwidth="4,2.2" />
    <barcode type="80" height="100" size="57" bcheight="100" bcwidth="5,2.3" />
    <barcode type="80" height="100" size="58" bcheight="50" bcwidth="1,2.4" />
    <barcode type="20" height="100" size="20" bcheight="60" bcwidth="2,2.9" />
   </barcodes>
 </zebra>
Type de code barre
| 2 | PDF 417 |
| 11 | Data Matrix |
| 12 | QR Code |
| 14 | MaxiCode |
| 17 | EAN 13 |
| 18 | EAN 8 |
| 19 | Code 39 |
| 20 | Code 39 sans contrôle |
| 21 | Code 128 alpha optimisé |
| 22 | Code 128 alpha non optimisé |
| 23 | Code 128 numérique |
| 24 | 2 Parmi 5 Entrelacé |
| 25 | 2 Parmi 5 Entrelacé sans contrôle |
| 26 | 2 Parmi 5 Industriel |
| 27 | 2 Parmi 5 Industriel sans contrôle |
| 28 | EAN 128 alpha non optimisé |
| 29 | EAN 128 numérique |
| 30 | EAN 128 alpha optimisé |
| 31 | Postnet |
| 32 | Planet |
| 35 | Native |
| 77 | Japan Postal |
| 78 | Codabar |
| 79 | USPS |
| 80 | UPC-A |
| 81 | UPC-E |
| 82 | MSI |
| 83 | MSI 2 mod. 10 |
| 84 | MSI mod. 11 |
| 85 | MSI mod. 11 mod. 10 |
| 86 | MSI no check |
Conversion en ELTRON
Balise Language
Pour paramétrer le profil de conversion en conversion XPS to ELTRON, il faut mettre le paramètre language à ELTRON <language>ELTRON</language>
Personnalisation de la taille des codes-Barres
- bcheight : hauteur désirée du code barre en points.
- bcwidth : série de 2 valeurs, séparées par une virgule, correspondant respectivement à :
- la largeur d’un élément épais en points
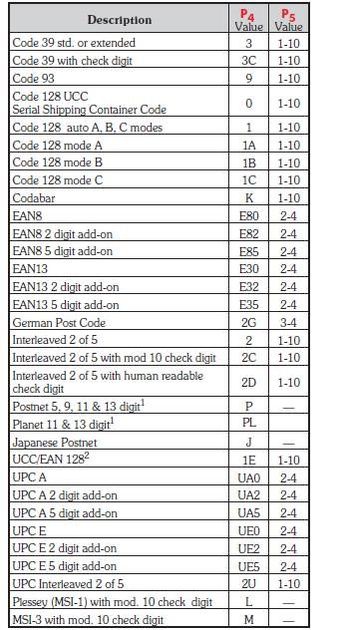
- la largeur d’un élément fin en points, dépendante du type de code barre (voir tableau suivant, valeur P5)
Identification des polices résidentes
 <fonts>
   <font name="Arial" size="14" italic="0" bold="0" zoomx="2" zoomy="2" codeFont="3" />
 </fonts>
Où les valeurs decodeFontvont de 1 à 5 :
- -> 6 points en 203dpi, 4 points en 300dpi
- -> 7 points en 203dpi, 6 points en 300dpi
- -> 10 points en 203dpi, 8 points en 300dpi
- -> 12 points en 203dpi, 10 points en 300dpi
- -> 24 points en 203dpi, 21 points en 300dpi
Les facteurs d’amplification agissent comme suit :
- zoomx : amplification horizontale, valeurs : 1, 2, 3, 4, 6, 8.
- zoomy : amplification verticale, valeurs : 1, 2, 3, 4, 5, 6, 7, 8, 9.
Autres paramètres
<gap>35</gap>
Permet de définir l’écart (en points) entre deux étiquettes
<euro>h0A</euro>
Valeur décimale ou hexadécimale pour l’interprétation du symbole Euro (€)
<storeform>OFF</storeform>
Activation ou non de la génération en mode ‘Formulaire’ (sorte d’équivalent d’un élément variable M-Designer : définition d’un modèle d’étiquette avec des données variables puis appel X fois du formulaire avec les valeurs spécifiques à chaque étiquette).
Valeurs supportées : ON/OFF, on/off, YES/NO, yes/no, 0/1
Valeur par défaut : OFF
<density>0</sensity>
Densité d’impression.
Valeurs supportées : de 0 à 15
<feedspeed>C</feedspeed>
Vitesse de sortie de l’étiquette.
Valeurs supportées: de A à S
Valeur par défaut : C
<printdirection>T</printdirection>
Direction de l’impression.
Valeurs supportées : T (Top) ou B (Bottom)
Valeur par défaut : T
<countrycode>001</countrycode>
Code pays.
Valeurs supportées : 001 (USA)…
<offset>0</offset>
Décalage en point du début de l’étiquette (marge).
Conversion en TEC
Balise Language
Pour paramétrer le profil de conversion en conversion XPS to TEC, il faut mettre le paramètre language à TEC <language>TEC</language>
Personnalisation de la taille des codes-barres
⇒ bcheight : hauteur désirée du code barre sur quatre chiffres (de 0000 à 1000, avec une unité de 0,1 mm).
⇒ bcwidth : la valeur et sa signification dépend du type de code barre
⇒ barguard : Pour certains types de codes-barres, cette option permet de rajouter un espace blanc à gauche et à droite du code barre. La valeur correspond à la largeur exprimée en dixième de millimètre, de cet espace.
Codes-barres impactés : EAN 8, EAN 13, Code 128, UPC-E, UPC-A, Postnet.
Pour les codes-barres EAN 8, EAN 13, UPC-E, UPC-A, Code 128, UCC / EAN 128 et Postnet, la valeur bcwidth correspond à la largeur, en points, d’un module (de 01 à 15).
Pour les codes-barres MSI, deux parmi cinq Entrelacé et Industriel, Code 39, le paramètre bcwidth est composé d’une série de quatre valeurs à deux chiffres (de 01 à 99), séparées par une virgule et exprimées en points correspondant respectivement à :
- la largeur d’un élément fin
- la largeur d’un espace fin
- la largeur l’un élément épais
- la largeur d’un espace épais
Identification des polices résidentes
⇒ type : deux types de polices résidentes sont utilisables en langage TEC : les polices bitmap (type PC) et les polices vectorielles (type PV)
Liste et signification des valeurs de codeFont en type PC :
E: Times Roman (Bold) 14 points
J: Helvetica (Bold) 12 points
M: Presentation (Bold) 18 points
N: Letter Gothic (Medium) 9.5 points
O: Prestige Elite (Medium) 7 points
Q: Courier (Medium) 10 points
Liste et signification des valeurs de codeFont en type PV :
A: TEC FONT1 (Helvetica [bold])
B: TEC FONT1 (Helvetica [bold] proportional)
Autres paramètres
<euro>h0A</euro>
Valeur décimale ou hexadécimale pour l’interprétation du symbole Euro (€)
<gap>35</gap>
Permet de définir l’écart (en points) entre deux étiquettes. En sortie TEC, l’indication de la taille d’une étiquette est donnée par les dimensions du XPS + la valeur du gap.
<density>0</density>
Densité d’impression (de -10 à 10). En sortie TEC, la densité est traduite par l’ajustement de la chauffe de l’imprimante (commande AY).
<printmode>0</printmode>
Mode d’impression thermique : 0 (transfert thermique) ou 1 (thermique direct).
<feed>0</feed>
Activation ou non de l’éjection de l’étiquette.
Valeurs supportées: ON/OFF, on/off, YES/NO, yes/no, 0/1
En sortie TEC, l’activation de ce paramètre permet de définir la synchronisation de l’avance papier (commande T).
<sensortype>0</sensortype>
Type de capteur de fin d’étiquette (cellule de détection).
Valeurs supportées : 0 (pas de détection), 1 (marque noir), 2 (échenillage), 3 (échenillage avec pré-impression).
<cut>0</cut>
Activation ou non du cutter.
Valeurs supportées: ON/OFF, on/off, YES/NO, yes/no, 0/1
<cutinterval>0</cutinterval>
Intervalle de coupe (en nombre d’étiquettes).
< feedmode>C</feedmode>
Mode d’impression : C (impression continue, avec ou sans coupe), D (mode peel-off pour les étiquettes autocollantes).
<feedspeed>C</feedspeed>
Vitesse d’impression, en pouces / seconde.
Valeurs supportées : 0, 2, 4 ou 6.
<ribbonuse>0</ribbonuse>
Utilisation ou non d’un ruban pour l’impression.
Valeurs supportées : 0 (impression directe, sans ruban), 1 (transfert thermique avec économie de ruban), 2 (transfert thermique sans économie de ruban).
<image>BMP</image>
Format des images embarquées.
Valeurs supportées : BMP, PCX, HEX
<backingwidth>410</backingwidth>
Largeur totale du papier (largeur de l’étiquette + largeur des bords).
Attention : cette valeur est ignorée par certaines imprimantes.
Conversion en MONARCH
Balise Language
Pour paramétrer le profil de conversion en conversion XPS to MONARCH, il faut mettre le paramètre language à MONARCH <language>MONARCH</language>
Personnalisation de la taille des codes_barres
⇒ bcheight : hauteur désirée du code barre en points.
⇒ bcwidth : valeur de densité du code barre.
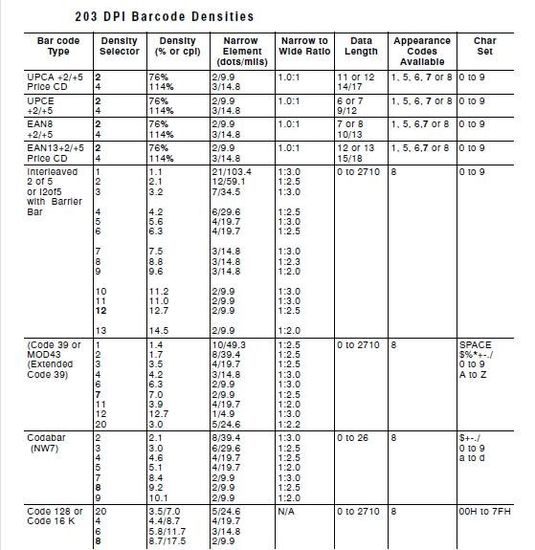
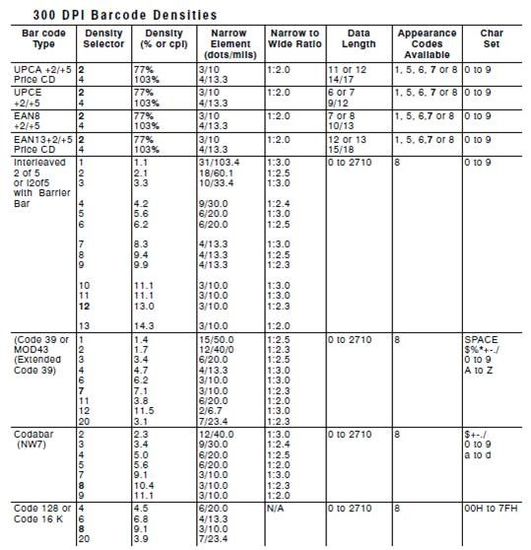
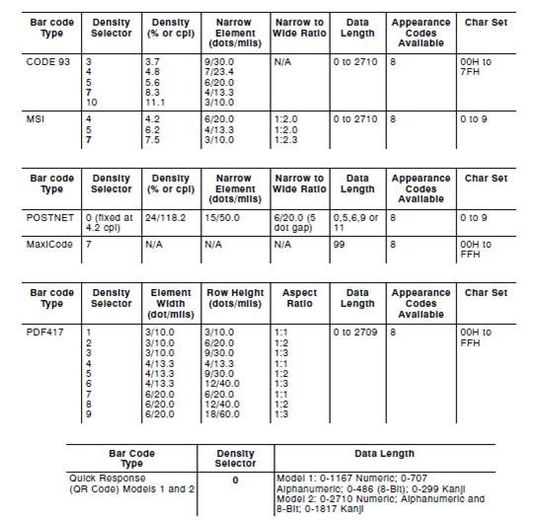
Les tableaux suivants présentent les différentes valeurs de densités (Density Selector) en fonction du type de code barre et de la résolution.
Pour une résolution 203 dpi :
Pour une résolution 300 dpi :
Autres paramètres
<euro>h0A</euro>
Valeur décimale ou hexadécimale pour l’interprétation du symbole Euro (€)
Conversion en IGP
Balise Language
Pour paramétrer le profil de conversion en conversion XPS to IGP, il faut mettre le paramètre language à IGP <language>IGP</language>
Personnalisation de la taille des codes-barres
⇒ bcheight : hauteur désirée du code barre, définie en pouces (inch) par un couple de valeurs séparées par un point : nn.m
- nn vaut de 3 à 99, pour une correspondance de 0,3 à 9,9 pouces
- m correspond à un nombre de points supplémentaires (optionnel)
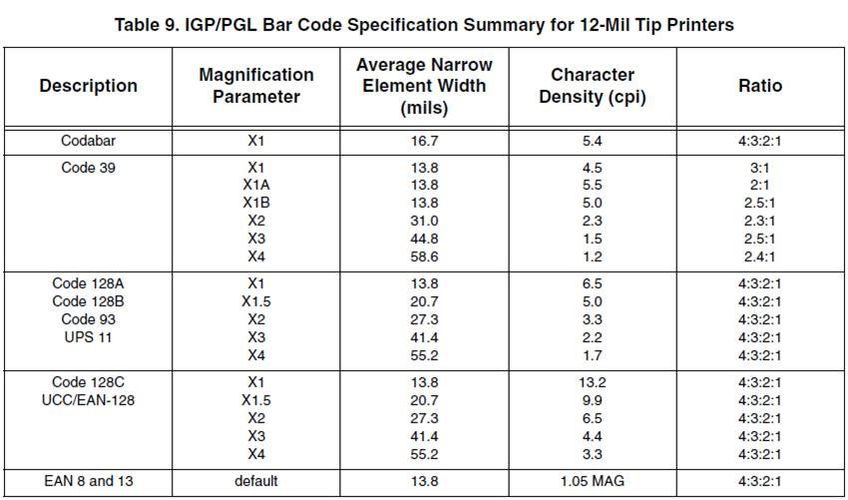
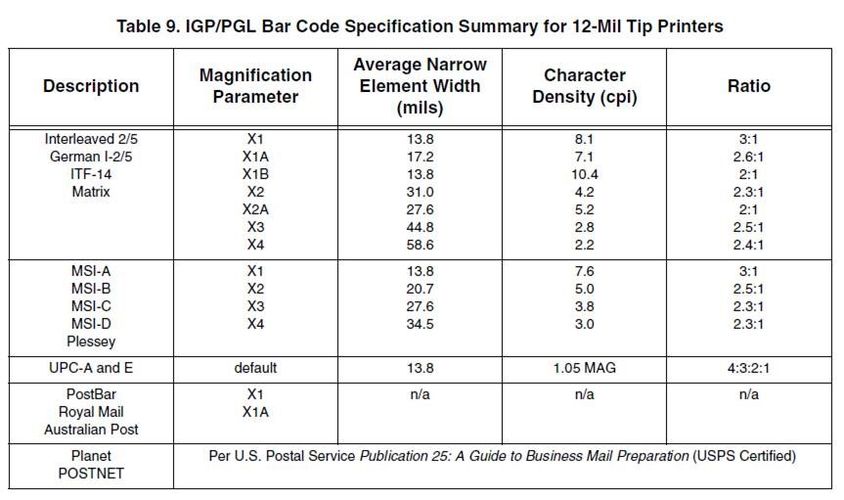
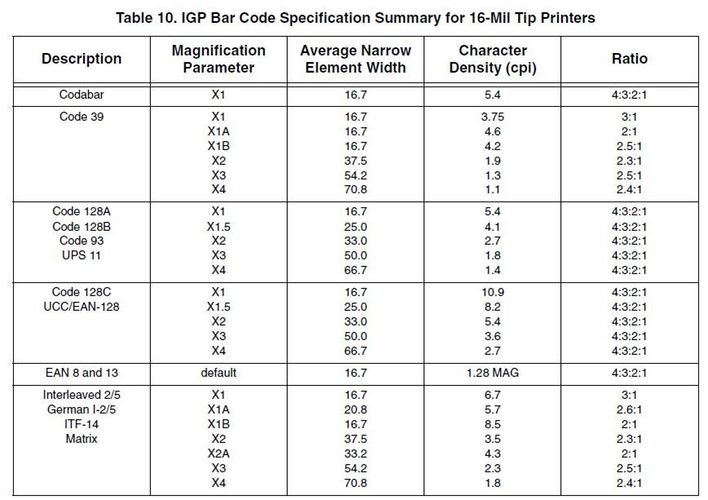
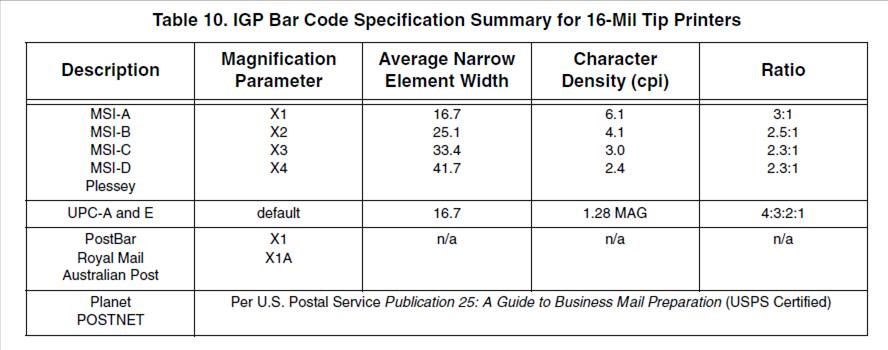
⇒ bcwidth : correspond à un paramètre d’agrandissement (Magnification Parameter) dépendant du type de code barre (voir tableaux suivants)
Autres paramètres
<image>PCX</image>
Permet de définir le format des images en sortie.
Valeurs supportées : PCX, HEX
<dpiH>…</dpiH>
Paramètre de résolution horizontale
<dpiV>…</dpiV>
Paramètre de résolution verticale
Conversion en DATAMAX(DPL)
Balise Language
Pour paramétrer le profil de conversion en conversion XPS to DPL, il faut mettre le paramètre language à DPL <language>DPL</language>
Personnalisation de la taille des codes-barres
<barcodes>
       <barcode type="96" height="100" size="47" bcheight="050" bcwidth="36" />
</barcodes>
⇒ bcheight : hauteur désirée du code barre en points. La valeur doit obligatoirement être sur trois caractères, de 001 à 999.
⇒ bcwidth : valeur composée de deux caractères, chacun pouvant prendre une valeur de 1 à 9 et de A à O (base 25) et correspondant respectivement à :
- la largeur d’un élément épais (1 correspond à 0.085 mm, et O à 2.011 mm)
- la largeur d’un élément fin (1 correspond à 1 point, et O à 24 points)
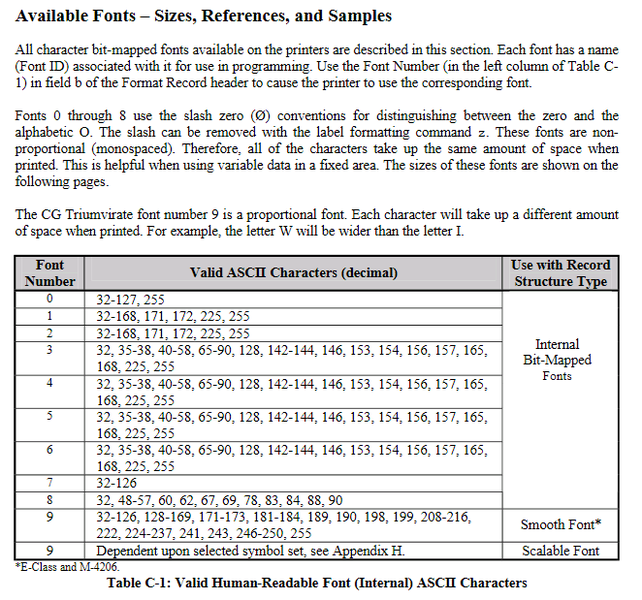
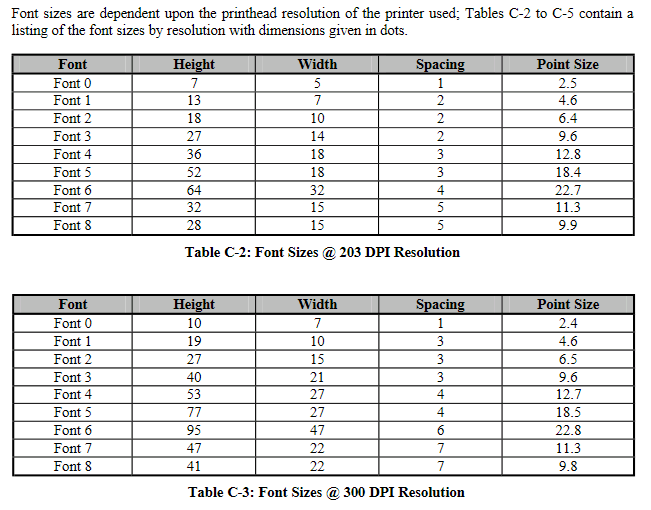
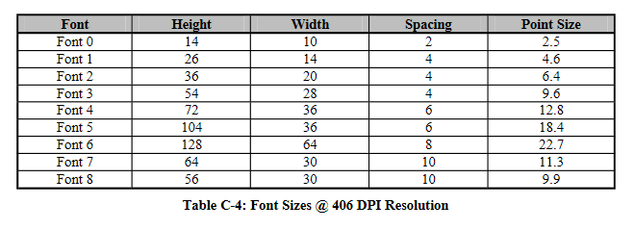
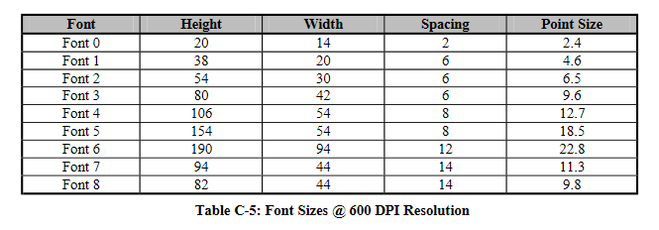
Identification des polices résidentes
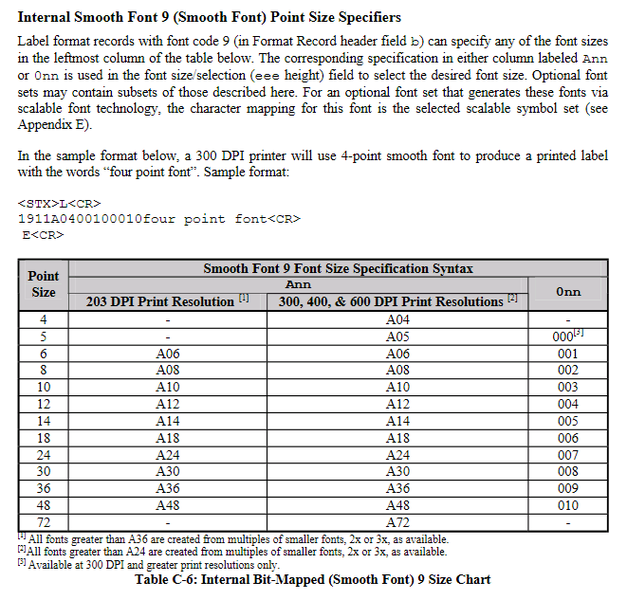
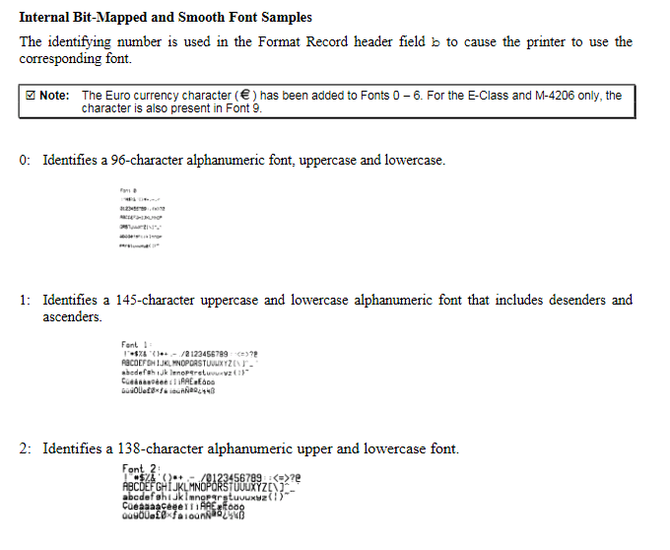
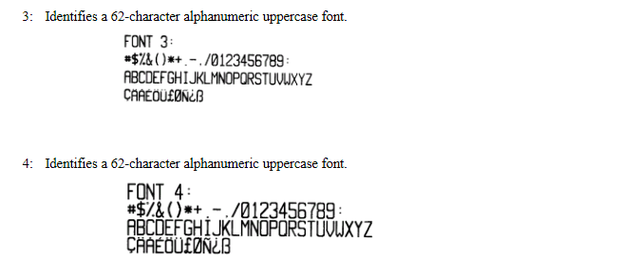
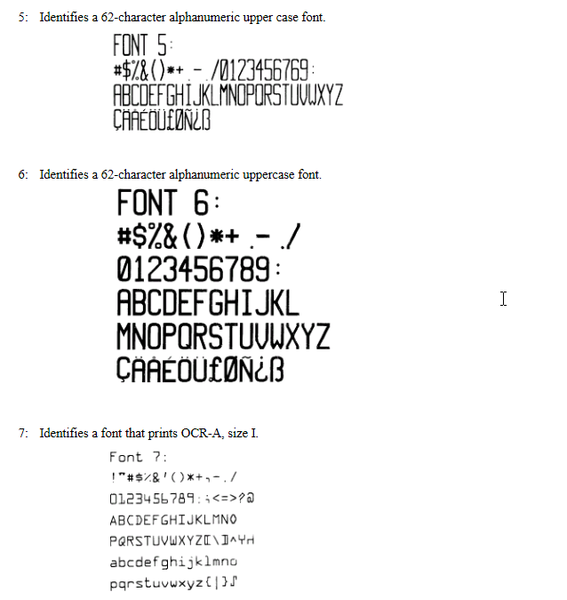
Les informations nécessaires à l’identification des polices résidentes DPL sont données dans les tableaux suivants :
Autres paramètres
<gap>35</gap>
Permet de définir l’écart (en points) entre deux étiquettes.
<density>0</density>
Densité d’impression.
Valeurs supportées : de 0 à 15
<feedspeed>C</feedspeed> Vitesse de sortie de l’étiquette.
Valeurs supportées : de A à S
Valeur par défaut : C
<printdirection>T</printdirection>
Direction de l’impression.
Valeurs supportées: T (Top) ou B (Bottom)
Valeur par défaut : T
<countrycode>001</countrycode>
Code pays.
Valeurs supportées : 001 (USA)…
<offset>0</offset>
Décalage en point du début de l’étiquette (marge). Onyx 9.0 utilisation:utilisation des profils de conversion
