OPALE - 10.0 - Installation - Installation OPALE Server/en
Différence entre versions
(Page créée avec « However, it is also possible to transfer the ZIP archive and afterwards: ») |
(Contenu remplacé par « . ») |
||
| (121 révisions intermédiaires par 3 utilisateurs non affichées) | |||
| Ligne 1 : | Ligne 1 : | ||
| − | == | + | <languages /> |
| + | ==Requirements== | ||
| − | + | This guide explains how to install and update OPALE Server on an IBM i server. | |
| − | + | As a reminder, it is recommended to also update the other Mapping Suite software components at the same time to prevent errors due to version conflicts. | |
| − | === | + | ===System=== |
| − | + | Minimum requirements: | |
| − | *OS/400 V7R1 | + | *OS/400 V7R1 or higher |
| − | *2 | + | *2 Gb of free disk space |
| − | * | + | *FTP connection |
| − | + | ||
| − | + | In case of M-Processing Server update: | |
| − | * | + | *Please refer to the [[OPALE:10.0:Migration:Process de migration|Upgrade Process]]. |
| − | + | Note: On OS/400 V7R1 and higher, the versions of M-Processing Server older than 7.1 are not compatible. | |
| − | === | + | ===Security=== |
The <code>QSECOFR</code> profile is required to install the software. | The <code>QSECOFR</code> profile is required to install the software. | ||
| Ligne 45 : | Ligne 46 : | ||
====Transferring and creating content from the library==== | ====Transferring and creating content from the library==== | ||
| − | There are 3 solutions | + | There are 3 solutions: |
| − | *Transferring the file <span style="background-color:rgba(0, 0, 255, 0.2);">MXXXXX.SAVF</span> via FTP to the previously created library | + | *Transferring the file <span style="background-color:rgba(0, 0, 255, 0.2);">MXXXXX.SAVF</span> via FTP to the previously created library (recommended). |
*Transferring the file <span style="background-color:rgba(0, 0, 255, 0.2);">MXXXXX.SAVF</span> via SCP to the previously created library. | *Transferring the file <span style="background-color:rgba(0, 0, 255, 0.2);">MXXXXX.SAVF</span> via SCP to the previously created library. | ||
| − | However, it is also possible to transfer the ZIP archive and | + | However, it is also possible to transfer the ZIP archive and then: |
| − | * | + | *Extract the archive directly into the library created previously. |
| − | ===== | + | =====Transferring the SAVF to the IBM i using FTP===== |
| − | + | Transferring the MXXXXX.SAVF to the created library. | |
| − | * | + | *Under Windows in Start/Programs, choose MS-DOS Command Prompt |
| − | * | + | *Go to the folder where the file you have just downloaded is saved e.g. CD My documents\Mapping |
| − | * | + | *Enter ftp "AS400 IP address" (no quotes) e.g. ftp 9.5.5.3 |
| − | * | + | *And then sign in on the IBM i |
| − | * | + | *Enter '''binary''' |
| − | * | + | *Enter '''cd qgpl''' (or the library of the savf file you have created) |
| − | * | + | *Enter '''put <span style="background-color:rgba(0, 0, 255, 0.2);">MXXXXX.savf</span>''' |
| − | *… ( | + | *… (the file is being transferred and then you regain control) |
| − | * | + | *Enter '''close''' |
| − | * | + | *Then '''quit''' |
| − | * | + | *And then '''exit''' |
| Ligne 75 : | Ligne 76 : | ||
| − | + | Then, skip to '''Restoring the SAVF'''. | |
| − | ===== | + | =====SSH Transfer to the IFS===== |
| − | + | If the IBM i has its SSH server configured. | |
| − | + | Transfer the SAVF file (or the ZIP file) using the SCP protocol (e.g. using WinSCP) to a folder on the IFS. | |
scp <span style="background-color:rgba(0, 0, 255, 0.2);">MXXXXX.SAVF</span> user@as400:/QSYS.LIB/QGPL.LIB | scp <span style="background-color:rgba(0, 0, 255, 0.2);">MXXXXX.SAVF</span> user@as400:/QSYS.LIB/QGPL.LIB | ||
| − | + | Then, skip to '''Restoring the SAVF'''. | |
| − | ===== | + | =====Extracting the SAVF to the IFS===== |
| − | + | If the ZIP archive has been transferred to the IBM i, you can use the <code>jar</code> tool to unzip it, under <code>qsh</code>. | |
| − | + | The extracted file should be <span style="background-color:rgba(0, 0, 255, 0.2);">MXXXXX.SAVF</span> : | |
jar xf setup_Opale_server_v10.0.2.XXXXX.zip | jar xf setup_Opale_server_v10.0.2.XXXXX.zip | ||
cp <span style="background-color:rgba(0, 0, 255, 0.2);">MXXXXX.SAVF</span> /QSYS.LIB/QGPL.LIB/<span style="background-color:rgba(0, 0, 255, 0.2);">MXXXXX</span>.FILE | cp <span style="background-color:rgba(0, 0, 255, 0.2);">MXXXXX.SAVF</span> /QSYS.LIB/QGPL.LIB/<span style="background-color:rgba(0, 0, 255, 0.2);">MXXXXX</span>.FILE | ||
| − | + | Then skip to '''Restoring the SAVF'''. | |
| − | ==== | + | ====Restoring the SAVF==== |
| − | + | Run this command: | |
RSTOBJ OBJ(*ALL) SAVLIB(QTEMP) DEV(*SAVF) SAVF(QGPL/<span style="background-color:rgba(0, 0, 255, 0.2);">MXXXXX</span>) | RSTOBJ OBJ(*ALL) SAVLIB(QTEMP) DEV(*SAVF) SAVF(QGPL/<span style="background-color:rgba(0, 0, 255, 0.2);">MXXXXX</span>) | ||
| − | ==== | + | ====Launch the installation script==== |
| − | + | Run this command: | |
CALL PGM(QTEMP/RUNSETUP) | CALL PGM(QTEMP/RUNSETUP) | ||
| − | ==== | + | ====Installation steps==== |
| − | + | Enter the name of the library you want to install or update.<br /> | |
| − | <u> | + | <u>Caution</u>: Whether this is a new install or an upgrade, do not use a production library. Please refer to the [[OPALE:10.0:Migration:Process de migration|Upgrade process]] |
| − | [[OPALE:10.0:Migration:Process de migration| | ||
[[File:Install0.PNG|700px|none]] | [[File:Install0.PNG|700px|none]] | ||
| − | + | You will need to specify the: | |
| − | * | + | *Sub-system name |
| − | * | + | *Installation folders |
| − | * | + | *System LANGID and code page |
| Ligne 126 : | Ligne 126 : | ||
| − | + | Note: The code page must always be 4 digits. Example 0037 or 0500. | |
| − | + | Sample code page: <br /> | |
| − | 0297 : | + | 0297: French without Euro € symbol<br /> |
| − | 1147 : | + | 1147: French with Euro € symbol <br /> |
| − | + | After that if you are installing the product, you will need to [[OPALE:10.0:Saisie_de_la_clef_logicielle|enter the software activation codes called software keys]]. If you skip this step, you can do it later by running the '''MAPKEY''' command. See Software Activation. If you are updating the product or do not have the software activation keys now, press <kbd>F3</kbd> to skip. | |
| − | [[File: | + | [[File:OP_S_MAPKEY_EN.JPG|700px|none]] |
| − | + | Installation is complete when the following screen is displayed. Press <kbd>Enter</kbd> to continue. | |
| − | [[File: | + | [[File:OP_S_environment_en.JPG|700px|none]] |
| − | + | Note: After installing and before using the product, you will need to end the session and sign back in. | |
| − | === | + | ===Language=== |
| − | ==== | + | ====Selecting the language in the Mapping menu==== |
| − | + | The screens of the Mapping menu can be displayed in the following languages: | |
| − | * | + | *French: MAPMSGFRA |
| − | * | + | *English: MAPMSGENU |
| − | * | + | *Japanese: MAPMSGJPN |
| − | + | The language is specified in the environment settings (Language File + Language ID). | |
| − | Menu | + | Mapping Menu (enter the command <code>GO MAPPING</code>), choose Option <kbd>14</kbd> then Option <kbd>1</kbd>. |
| − | + | or from the general Mapping menu: Operations menu / Mapping Environment Settings | |
| − | + | Otherwise, from the OPALE menu, choose Operations and then "Mapping Environment Settings" | |
| − | [[File: | + | [[File:OP_S_param_envir.JPG|700px|none]] |
| − | [[File: | + | [[File:OP_S_environment_lang_en.jpg|700px|none]] |
| − | ==== | + | ====Code pages==== |
| − | ===== | + | =====Supported code pages===== |
{| class="wikitable" | {| class="wikitable" | ||
!Code | !Code | ||
| Ligne 418 : | Ligne 418 : | ||
| − | ===== | + | =====Unsupported code pages===== |
{| class="wikitable" | {| class="wikitable" | ||
!Code | !Code | ||
| Ligne 465 : | Ligne 465 : | ||
|} | |} | ||
| − | ==Activation | + | ==Software Activation== |
| − | + | After installing the software, you will need to enter activation codes called licence keys. The licence keys are hardware-dependent. To obtain the licence keys for your system, you will need to: | |
| − | * | + | *Retrieve the system id |
| − | * | + | *Contact Technical Support, or log on to https://server.mappingsuite.com |
| − | + | Note: If the licence keys are not entered, some screens in the Mapping menu cannot be accessed. | |
| − | === | + | ===Server ID=== |
| − | + | Run the <code>MAPKEY</code> command to retrieve the information needed to generate your licence keys. | |
| − | + | Write down the information below and then press <kbd>F3</kbd> to exit. | |
*Serial Number | *Serial Number | ||
| Ligne 484 : | Ligne 484 : | ||
*Processor Type | *Processor Type | ||
| − | [[File: | + | [[File:OP_S_MAPKEY_EN.JPG|700px|none]] |
| − | === | + | ===Entering licence keys=== |
| − | + | The number of licence keys required depends on the options purchased. | |
| − | + | For each key, run the <code>MAPKEY</code> command and [[OPALE:10.0:Saisie_de_la_clef_logicielle|enter the product number associated with the key]], and then press <kbd>Enter</kbd> to save. | |
| − | + | . | |
| − | + | Note: If the key you have entered is correct, the screen above is displayed and there is no confirmation message. If not, the key is highlighted as shown below but there is no error message. | |
[[File:Erroroactivation.PNG|600px|none]] | [[File:Erroroactivation.PNG|600px|none]] | ||
| − | == | + | ==Post-Installation checklist== |
| − | + | This section is designed to help you check that the installation process was successful, and that the Mapping environment is configured correctly. | |
| − | + | Just follow each step as explained. All checkpoints are listed to ensure that you can use the software as intended. | |
| − | === | + | ===Activating the MAPPING user account=== |
| − | + | The first thing you want to do is to activate the MAPPING user account on the system. | |
| − | + | By default during the installation process, the MAPPING user account is created with a blank password. | |
| − | + | Run the <code>CHGUSRPRF</code> command to set a password for the MAPPING user account. | |
| − | + | If you skip this step, you will not be able to use this user account for test purposes. | |
| − | + | The MAPPING user account has all the permissions needed to use the MAPPING software. It’s an account of type <code>*PGMR</code> that can be used as you see fit, if necessary. | |
| − | === | + | ===Checking the MAPPING environment=== |
| − | + | On the command line, type <code>MAPPING</code> to open the main menu. | |
| − | + | Select option "Mapping Environment Settings" from the Operations menu. | |
| − | + | The paths are displayed in the lower end of the screen and the values depend on the system's language. The values may vary with the system on which the software is installed. | |
| − | === | + | ===Checking the IFS=== |
| − | + | It is also recommended that you check the IFS. The easiest way to do this is to run the WRKLNK command. | |
| − | + | In any case, the following folders should be found in the IFS: mapout, mapping, mapreport, mapsend. | |
| − | === | + | ===System objects required by MAPPING software=== |
| − | + | Another thing you might want to do is check the Job Queues and Job Descriptions required for use with Mapping. Run the WRKOBJ command to list MAP* objects required by the software. | |
| − | + | The following Job Queues are required: | |
MAPQFIND, MAPQMIDDLE, MAPQROBOT, MAPQSLOW, MAPQSMTP, MAPQSMTP2, MAPQSPEED, MAPQTCPIP | MAPQFIND, MAPQMIDDLE, MAPQROBOT, MAPQSLOW, MAPQSMTP, MAPQSMTP2, MAPQSPEED, MAPQTCPIP | ||
| − | + | The following Job Descriptions are required: | |
| − | + | MAPDFIND, MAPDMIDDLE, MAPDROBOT, MAPDSLOW, MAPDSMTP, MAPDSMTP2, MAPDSPEED, MAPDTCPIP | |
| − | === | + | ===Starting the Robot=== |
| − | + | Run the <code>STRRBT</code> command to start the robot, and then run the <code>WRKSBS</code> command to show the sub-system. | |
Version actuelle datée du 6 juin 2019 à 12:27
Sommaire
Requirements
This guide explains how to install and update OPALE Server on an IBM i server.
As a reminder, it is recommended to also update the other Mapping Suite software components at the same time to prevent errors due to version conflicts.
System
Minimum requirements:
- OS/400 V7R1 or higher
- 2 Gb of free disk space
- FTP connection
In case of M-Processing Server update:
- Please refer to the Upgrade Process.
Note: On OS/400 V7R1 and higher, the versions of M-Processing Server older than 7.1 are not compatible.
Security
The QSECOFR profile is required to install the software.
Update or installation procedure
Update information
Please refer to the : Upgrade Process
Preparation
The software installation program can be downloaded from the Mapping Suite technical server at https://server.mappingsuite.com.
It is called setup_Opale_vXX.X.X.XXXXX.zip.
After downloading and uncompressing, it can safely be renamed to MXXXXX.SAVF.
Installing or updating by FTP
Creating the restore SAVF
Run this command:
CRTSAVF FILE(QGPL/MXXXXX)
Transferring and creating content from the library
There are 3 solutions:
- Transferring the file MXXXXX.SAVF via FTP to the previously created library (recommended).
- Transferring the file MXXXXX.SAVF via SCP to the previously created library.
However, it is also possible to transfer the ZIP archive and then:
- Extract the archive directly into the library created previously.
Transferring the SAVF to the IBM i using FTP
Transferring the MXXXXX.SAVF to the created library.
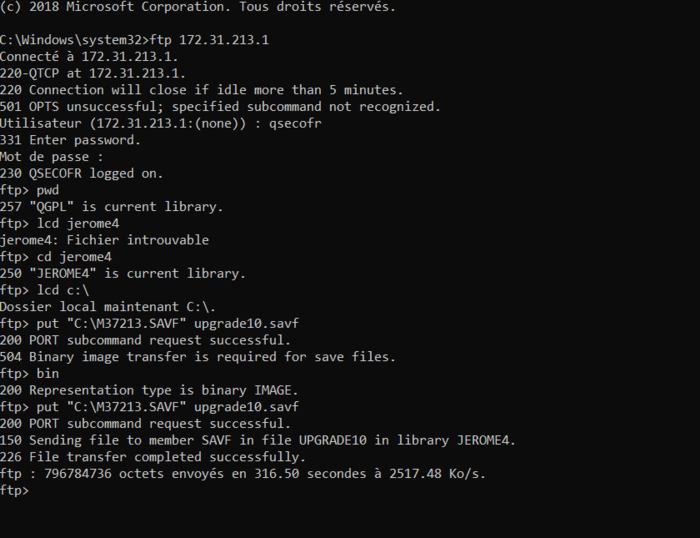
- Under Windows in Start/Programs, choose MS-DOS Command Prompt
- Go to the folder where the file you have just downloaded is saved e.g. CD My documents\Mapping
- Enter ftp "AS400 IP address" (no quotes) e.g. ftp 9.5.5.3
- And then sign in on the IBM i
- Enter binary
- Enter cd qgpl (or the library of the savf file you have created)
- Enter put MXXXXX.savf
- … (the file is being transferred and then you regain control)
- Enter close
- Then quit
- And then exit
Then, skip to Restoring the SAVF.
SSH Transfer to the IFS
If the IBM i has its SSH server configured.
Transfer the SAVF file (or the ZIP file) using the SCP protocol (e.g. using WinSCP) to a folder on the IFS.
scp MXXXXX.SAVF user@as400:/QSYS.LIB/QGPL.LIB
Then, skip to Restoring the SAVF.
Extracting the SAVF to the IFS
If the ZIP archive has been transferred to the IBM i, you can use the jar tool to unzip it, under qsh.
The extracted file should be MXXXXX.SAVF :
jar xf setup_Opale_server_v10.0.2.XXXXX.zip
cp MXXXXX.SAVF /QSYS.LIB/QGPL.LIB/MXXXXX.FILE
Then skip to Restoring the SAVF.
Restoring the SAVF
Run this command:
RSTOBJ OBJ(*ALL) SAVLIB(QTEMP) DEV(*SAVF) SAVF(QGPL/MXXXXX)
Launch the installation script
Run this command:
CALL PGM(QTEMP/RUNSETUP)
Installation steps
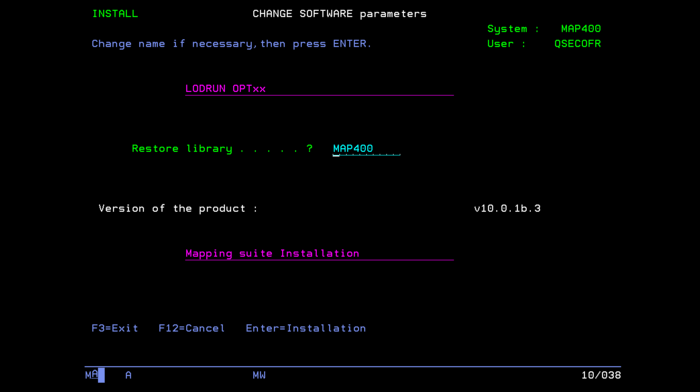
Enter the name of the library you want to install or update.
Caution: Whether this is a new install or an upgrade, do not use a production library. Please refer to the Upgrade process
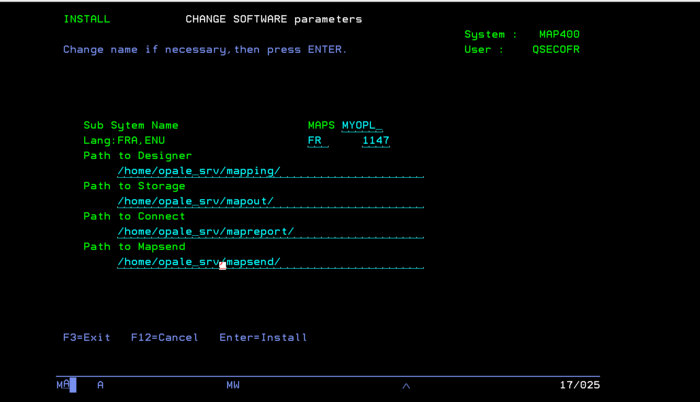
You will need to specify the:
- Sub-system name
- Installation folders
- System LANGID and code page
Note: The code page must always be 4 digits. Example 0037 or 0500.
Sample code page:
0297: French without Euro € symbol
1147: French with Euro € symbol
After that if you are installing the product, you will need to enter the software activation codes called software keys. If you skip this step, you can do it later by running the MAPKEY command. See Software Activation. If you are updating the product or do not have the software activation keys now, press F3 to skip.
Installation is complete when the following screen is displayed. Press Enter to continue.
Note: After installing and before using the product, you will need to end the session and sign back in.
Language
The screens of the Mapping menu can be displayed in the following languages:
- French: MAPMSGFRA
- English: MAPMSGENU
- Japanese: MAPMSGJPN
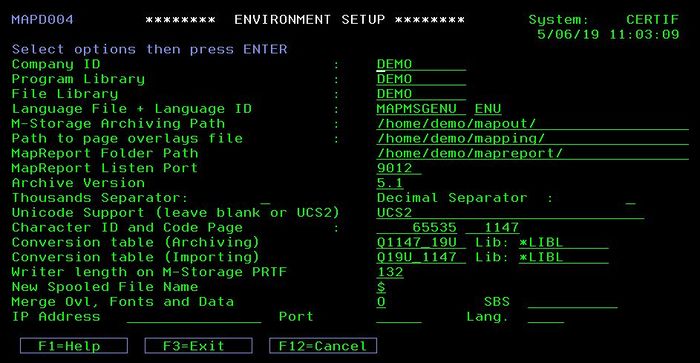
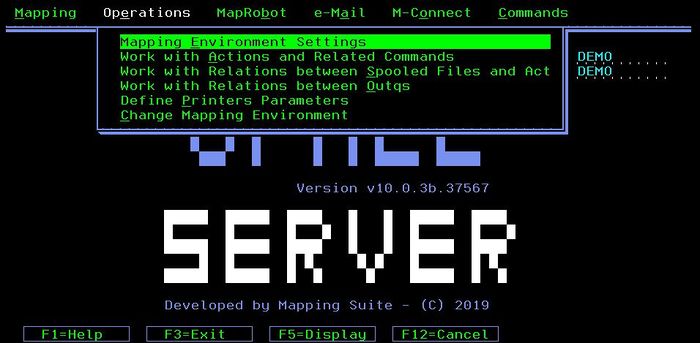
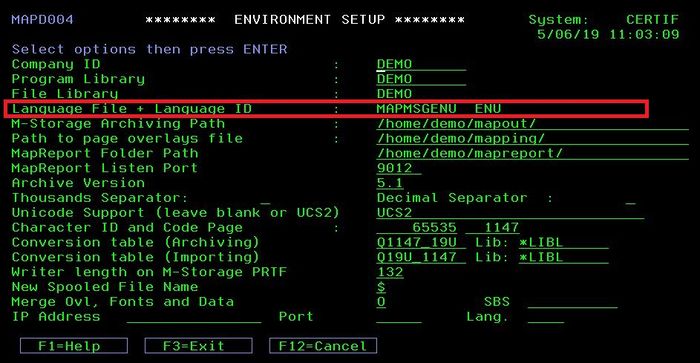
The language is specified in the environment settings (Language File + Language ID).
Mapping Menu (enter the command GO MAPPING), choose Option 14 then Option 1.
or from the general Mapping menu: Operations menu / Mapping Environment Settings
Otherwise, from the OPALE menu, choose Operations and then "Mapping Environment Settings"
Code pages
Supported code pages
| Code | Codepage | ISO | Nom | Fichier |
|---|---|---|---|---|
| AFR | (037) | {latin1:1252} | Afrikaans | [Q037_19U-Q19U_037] |
| BEL | (1025,1154) | {Russian:1251} | Byelorussian | [Q1154_9R-Q9R-1154] |
| BGR | (1025,1154) | {Russian:1251} | Bulgarian | [Q1154_9R-Q9R-1154] |
| CSY | (0870,1153) | {latin2:1250} | Czech | [Q1153_9E-Q9E_1153] |
| DES | (0500) | {latin1:1252} | Swiss German | [Q1141_19U-Q19U_1141] |
| DEU | (0273,1141) | {latin1:1252} | German | [Q1141_19U-Q19U_1141] |
| CHS | {0836} | {s.chinese:00935} | Simplified Chinese | [Q013_19U-Q19U_037- S_Chinese_base1993.tbl] |
| CHT | {0037} | {t.chinese:00937} | Traditional Chinese | [Q013_19U-Q19U_037- T_Chinese_base1999.tbl] |
| ELL | (0875) | {Greek:1253} | Greek | [Q875_9G-Q9G_875] |
| ENA | (037) | {latin1:1252} | Australian English | [Q037_19U-Q19U_037] |
| ENG | (0285,1146) | {latin1:1252} | United Kingdom English | [Q285_19U-Q19U_285] |
| ENP | (037) | {latin1:1252} | Uppercase English | [Q037_19U-Q19U_037] |
| ENU | (037) | {latin1:1252} | United States English | [Q037_19U-Q19U_037] |
| ESP | (0284,1145) | {latin1:1252} | Spanish | [Q1145_19U-Q19U_1145] |
| FRA | (0297,1147) | {latin1:1252} | French | [Q1147_19U-Q19U_1147] |
| FRB | (0500,1148) | {latin1:1252} | Belgian French | [Q1148_19U-Q19U_1148] |
| FRC | (0500) | {latin1:1252} | Canadian French | [Q1148_19U-Q19U_1148] |
| FRS | (0500) | {latin1:1252} | Swiss French | [Q1148_19U-Q19U_1148] |
| GAE | (0285,1146) | {latin1:1252} | Irish Gaelic | [Q285_19U-Q19U_285] |
| HRV | (0870,1153) | {latin2:1250} | Croatian | [Q1153_9E-Q9E_1153] |
| HUN | (0870,1153) | {latin2:1250} | Hungarian | [Q1153_9E-Q9E_1153] |
| ITA | (0280,1144) | {latin1:1252} | Italian | [Q1144_19U-Q19U_1144] |
| ITS | (0500) | {latin1:1252} | Swiss Italian | [Q1148_19U-Q19U_1148] |
| JPN | {0290} | {Japanese:05026} | Japanese Katakana | [Q013_19U-Q19U_037- Japanese_base1996.tbl] |
| KOR | {0833} | {Korean:00933} | Korean | [Q013_19U-Q19U_037- Korean_base1992.tbl] |
| MKD | (1025,1154) | {Russian:1251} | Macedonian | [Q1154_9R-Q9R-1154] |
| NLB | (0500,1148) | {latin1:1252) | Belgian Dutch | [Q1148_19U-Q19U_1148] |
| NLD | (037,1140) | {latin1:1252} | Dutch | [Q037_19U-Q19U_037] |
| PLK | (0870,1153) | {latin2:1250} | Polish | [Q1153_9E-Q9E_1153] |
| PTB | (037) | {latin1:1252} | Brazilian Portuguese | [Q037_19U-Q19U_037] |
| PTG | (037,1140) | {latin1:1252} | Portuguese | [Q037_19U-Q19U_037] |
| ROM | (0870,1153) | {latin2:1250} | Romanian | [Q1153_9E-Q9E_1153] |
| RUS | (1025,1154) | {Russian:1251} | Russian | [Q1154_9R-Q9R_1154] |
| SKY | (0870,1153) | {latin2:1250} | Slovakian | [Q1153_9E-Q9E_1153] |
| SLO | (0870,1153) | {latin2:1250} | Slovenian | [Q1153_9E-Q9E_1153] |
| SQI | (0500) | {latin1:1252} | Albanian | [Q1148_19U-Q19U_1148] |
| SRB | (1025,1154) | {Russian:1251} | Serbian Cyrillic | [Q1154_9R-Q9R-1154] |
| SRL | (0870,1153) | {latin2:1250} | Serbian Latin | [Q1153_9E-Q9E_1153] |
| TRK | (1026,1155) | {Turkish:1254} | Turkish | [Q1155_5T-Q5T_1155] |
| THA | {0838} | {Thai :874} | Thai | [Q838_0T-Q0T_383] |
Unsupported code pages
| Code | Codepage | Nom |
|---|---|---|
| ARA | 0420 | Arabic |
| CAT | 0284 | Catalan |
| DAN | 0277 | Danish |
| FAR | 1097 | Farsi |
| FIN | 0278 | Finnish |
| HEB | 0424 | None Hebrew |
| ISL | 0871 1149 | Icelandic |
| NON | 0277 | Norwegian Nynorsk |
| NOR | 0277 | Norwegian Bokmal |
| SVE | 0278 | Swedish |
Software Activation
After installing the software, you will need to enter activation codes called licence keys. The licence keys are hardware-dependent. To obtain the licence keys for your system, you will need to:
- Retrieve the system id
- Contact Technical Support, or log on to https://server.mappingsuite.com
Note: If the licence keys are not entered, some screens in the Mapping menu cannot be accessed.
Server ID
Run the MAPKEY command to retrieve the information needed to generate your licence keys.
Write down the information below and then press F3 to exit.
- Serial Number
- Model Number
- Processor Type
Entering licence keys
The number of licence keys required depends on the options purchased.
For each key, run the MAPKEY command and enter the product number associated with the key, and then press Enter to save.
.
Note: If the key you have entered is correct, the screen above is displayed and there is no confirmation message. If not, the key is highlighted as shown below but there is no error message.
Post-Installation checklist
This section is designed to help you check that the installation process was successful, and that the Mapping environment is configured correctly.
Just follow each step as explained. All checkpoints are listed to ensure that you can use the software as intended.
Activating the MAPPING user account
The first thing you want to do is to activate the MAPPING user account on the system.
By default during the installation process, the MAPPING user account is created with a blank password.
Run the CHGUSRPRF command to set a password for the MAPPING user account.
If you skip this step, you will not be able to use this user account for test purposes.
The MAPPING user account has all the permissions needed to use the MAPPING software. It’s an account of type *PGMR that can be used as you see fit, if necessary.
Checking the MAPPING environment
On the command line, type MAPPING to open the main menu.
Select option "Mapping Environment Settings" from the Operations menu.
The paths are displayed in the lower end of the screen and the values depend on the system's language. The values may vary with the system on which the software is installed.
Checking the IFS
It is also recommended that you check the IFS. The easiest way to do this is to run the WRKLNK command. In any case, the following folders should be found in the IFS: mapout, mapping, mapreport, mapsend.
System objects required by MAPPING software
Another thing you might want to do is check the Job Queues and Job Descriptions required for use with Mapping. Run the WRKOBJ command to list MAP* objects required by the software.
The following Job Queues are required:
MAPQFIND, MAPQMIDDLE, MAPQROBOT, MAPQSLOW, MAPQSMTP, MAPQSMTP2, MAPQSPEED, MAPQTCPIP
The following Job Descriptions are required: MAPDFIND, MAPDMIDDLE, MAPDROBOT, MAPDSLOW, MAPDSMTP, MAPDSMTP2, MAPDSPEED, MAPDTCPIP
Starting the Robot
Run the STRRBT command to start the robot, and then run the WRKSBS command to show the sub-system.
