OPALE - 10.0 - Usage
Tips to use Designer
Moving an object
To move an element of the overlay, select it first. Click on the icon, then on the element you want to move. To select multiple elements at once, hold the "Ctrl" key down and select each element.
The object is highlighted and it position/dimensions are displayed.
Once it was selected, the element can be moved using the mouse or the arows of your keyboard (numeric keyboard).
If the exact position of this element is known, its coordinates can be directly typed in (X and Y) as well as its dimensions (W and H), in the left part of the status bar.
Change the size of an object
Changing the size of an object can be done in two different ways:
- with your mouse: hold the button of your mouse down on one of the indicators (square shaped or circular) which surrounds the object, then move the indicator to change the size of the object. The object follows the movement of the indicator, which allows you to adjust the size in real time. The coordinates and dimensions of the object also adjust as you change the size of the object.
- By typing in the length and the height of the object directly (see above: the W and H fields).
Editing a geometric shape or a text box
Using the corresponding options in the toolbar, using a right click or using the properties of the object, on a geometric shape or a text box, several things can be edited:
- The outline: type, thickness, colour.
- The filling: none, shaded, hatched, shaded, coloured or not.
- The orientation (rotation).
Designing tips:
To rotate objects, it is recommended that you rotate one object at a time, do no select multiple objects to rotate at once.
Aligning an object
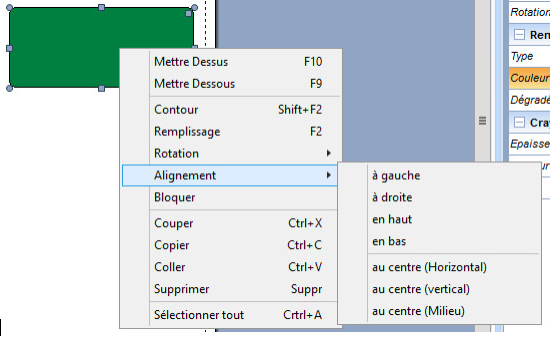
When an object is selected, a right-click will offer you various aligning options for the object.
Aligning it to the left, right, top and to the bottom allows you to align your object to the corresponding margins in the template. The three other options allow you to align the object to the center of the page:
- horizontally without changing its vertical position.
- vertically without changing its horizontal position.
- in the exact middle of the page.
Aligning multiple objects
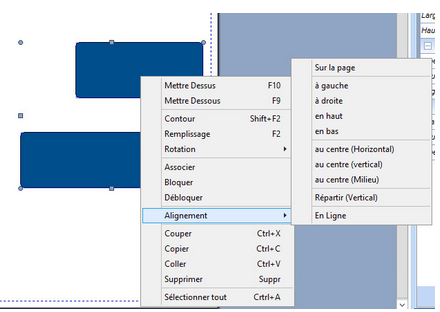
Objects can be aligned one with another. Once the elements are selected, a right-click will offer you aligning options corresponding to this set of elements.
- L’alignement « Sur la page » : si l’option est sélectionnée alors toutes les possibilités d’alignement seront appliquées sur la page en entier et non pas que sur la zone occupée par les objets sélectionnés.
- L’alignement à gauche repositionne tous les objets par rapport à celui le plus à gauche.
- L’alignement à droite repositionne tous les objets par rapport à celui le plus à droite.
- L’alignement en haut repositionne tous les objets par rapport à celui le plus haut.
- L’alignement en bas repositionne tous les objets par rapport à celui le plus bas.
- Le centrage horizontal repositionne tous les objets au centre de l’espace compris entre le plus à gauche et le plus à droite, sans modifier les positions verticales des objets.
- Le centrage vertical repositionne tous les objets au centre de l’espace compris entre le plus haut et le plus bas, sans modifier les positions horizontales des objets.
- Le centrage au milieu combine les deux options précédentes.
- La répartition verticale permet de répartir uniformément les objets sélectionnés sur toute la verticale de l’espace.
- L’alignement « En ligne » repositionne les objets verticalement en forçant l’espacement vertical entre chacun avec la valeur précisée. Très utile pour uniformiser la hauteur de lignes d’un tableau par exemple.
Drawing a straight line
To draw a straight line (horizontal or vertical), press the "Shift" or the "Crtl" key of your keyboard while you draw the line with your mouse. This option can also be activated by default in the Preferences of the application.
Creating a table
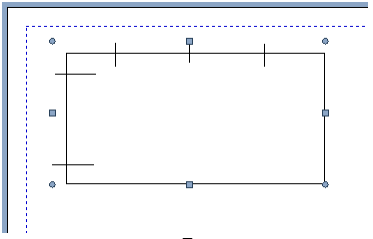
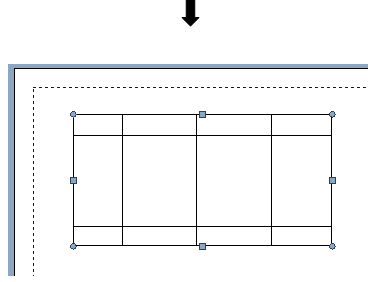
To create a perfectly drawn and aligned table without using the static table option:
- first, draw the rectangle that will act as the border of the table.
- draw the vertical lines to create columns.
- draw horizontal lines to create lines if necessary (column headers for example).
- finally select all elements of your table a,d press the lowercase "a" on your keyboard.
Note:
These tips also apply to designing the Dynamic part of a project.


