ONYX - 9.0
Envoi de fichiers PDF par e-mail/en
This documentation describes the function allowing PDF files to be sent by email (sending from an XPS file). This function is found in the workflow in the “Mail”, “Send PDF E-Mail” section.
Sommaire
- 1 Interface description
- 2 Examples
- 2.1 Variant 1: Sending email with attachment name and email body in plain text
- 2.2 Variant 2: Sending email with variable attachment name and email body in plain text
- 2.3 Variant 3: Sending email with attachment name coming from an index in the input XPS file
- 2.4 Variante 4: Envoi de mail avec une adresse de destination variable
- 2.5 Variante 5: Envoi d'un mail avec un Body et un Footer
- 2.6 Variante 6: Envoi d'un mail avec un corps HTML appelant un fichier HTML externe
- 2.7 Variante 7: Envoi d'un mail avec un corps HTML appelant un fichier HTML externe ayant des données variables
- 2.8 Variante 8: Envoi d 'un mail avec un corps HTML appelant un fichier HTML externe dynamique fonction d'un code société
- 3 Remarques
Interface description
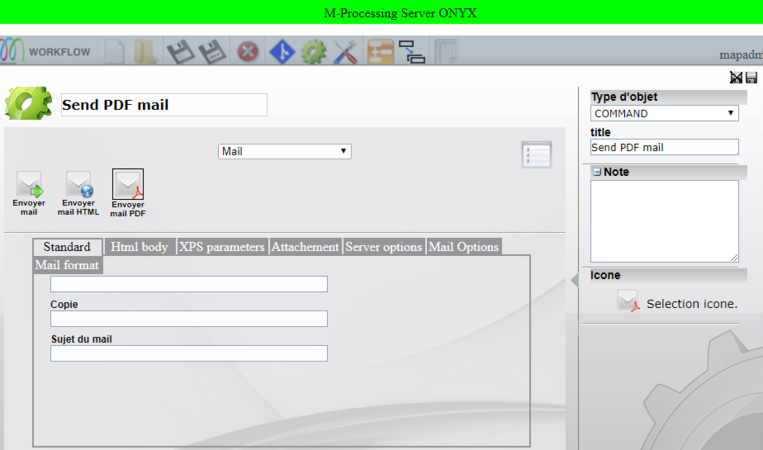
To access the interface for sending PDFs by e-mail, double click on the command in question, choose Mail then click on "Send May PDF"
Standard tab
To: This parameter allows you to enter the destination addresses
Cc: This parameter allows you to enter the addresses in copy (OPTIONAL)
Email subject: This parameter allows you to enter the subject of the email (OPTIONAL)
Note: Multiple recipients or copies can be entered, each separated by a semicolon. “; »
HTML BODY tab
This tab allows you to enter the body of the email to send.
Note: You can either type HTML directly or call an HTML file by typing the following syntax: FILE: C:\MyHtmlFile.html
XPS settings tab
This tab allows you to enter the XPS file to be converted by PDF and sent by email Input file: This parameter allows you to specify the XPS file to convert to PDF and send by email Profile: This parameter allows you to specify an XPS to PDF conversion profile
Attachment tab
This tab allows you to enter the name of the attachment
Attachment filename: This parameter allows you to specify the name of the attachment
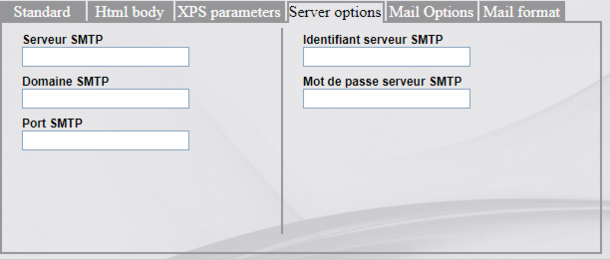
Server options tab
This tab allows you to enter the parameters of the SMTP server used for sending emails.
SMTP server: This parameter allows you to enter the IP address of the SMTP server or its DNS name SMTP domain: This parameter allows you to enter the domain name of the SMTP server SMTP port: This parameter allows you to enter the port number used for sending the email SMTP server login: This parameter allows you to enter the login used for connecting to the SMTP server SMTP server password: This parameter allows you to enter the password used for connecting to the SMTP server
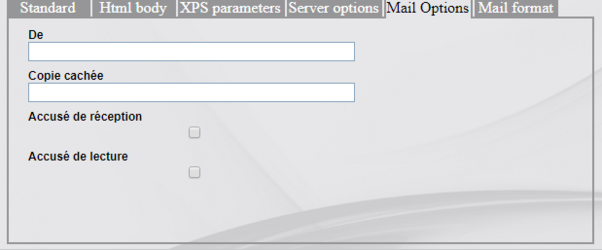
Mail options tab
This tab allows you to enter the sender of the email, the hidden copy (OPTIONAL), as well as the sending options (acknowledgment of receipt or read receipt)
- From: This parameter allows you to enter the sender of the email
- Bcc: This parameter allows you to enter the hidden copy(ies) of the email
- Acknowledgment: This option allows you to request an acknowledgment of receipt (if checked)
- Read receipt: This option allows you to request a reading receipt (if checked)
Note: Multiple blind copy recipients can be entered, each separated by a semicolon “; »
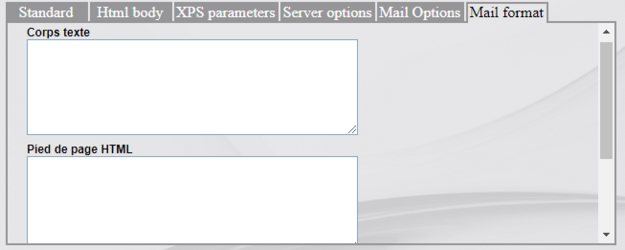
Mail tab format
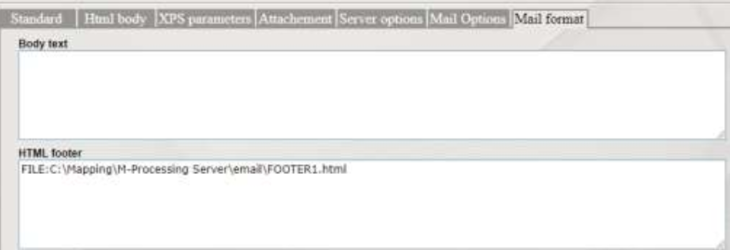
This tab allows you to enter the body of the email in Text mode (and not HTML), the footer of the email (in HTML mode or in Text mode)
- Body text: This parameter allows you to enter the body of the email in text mode (no formatting)
- HTML footer: This parameter allows you to enter the footer of the email in HTML mode (write directly from HTML)
- Text footer: This parameter allows you to enter the footer of the email in text mode (no formatting)
Note: You can either type HTML directly or call an HTML file by typing the following syntax: FILE: C:\MyHtmlFile.html
Examples
Variant 1: Sending email with attachment name and email body in plain text
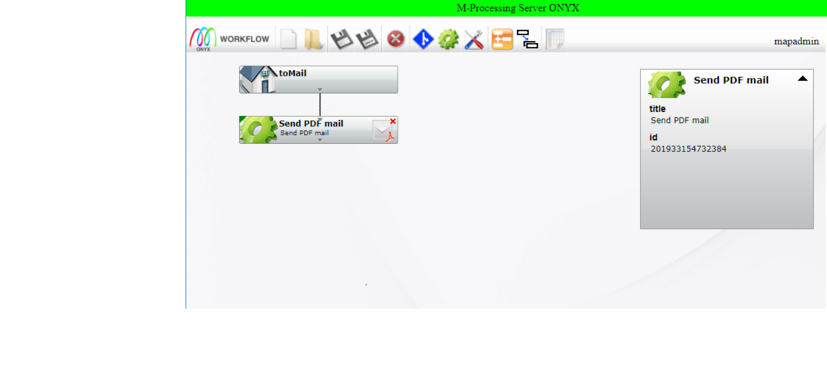
Let's take the following workflow as an example:
The “Send PDF mail” box must absolutely receive an XPS file. Any other file will be refused and an error will appear in the logs.
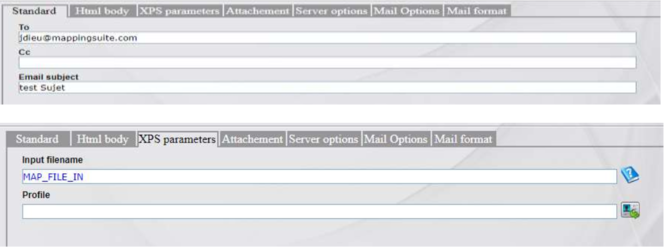
The box parameters are:
The file sent is the file received by the “MAP_FILE_IN” environment parameter box, it is entirely possible to put a hard file (for example: C:\MyFichier.xps). In this example, the input file would then only serve as a trigger.
Since it is a PDF sending box by email, there is no need to specify the name of the extension, a PDF will automatically be included in the email.
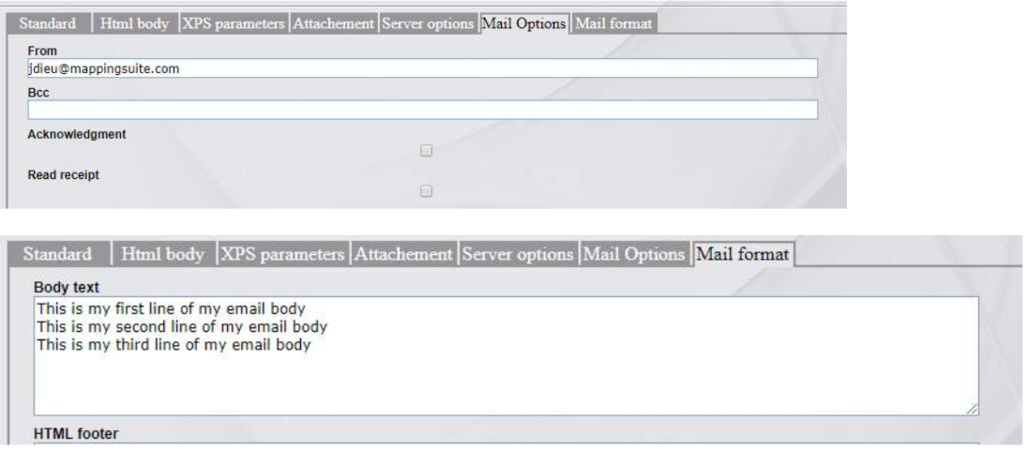
- This action sends an email to “jdieu@mappingsuite.com” on behalf of “jdieu@mappingsuite.com” with an attachment MyAttachment.pdf and for body:
This is my first line of my email body
This is my second line of my email body
This is my third line of my email body
Variant 2: Sending email with variable attachment name and email body in plain text
In this example, we send an email with an attachment having a dynamic name equal to the name of the input file received by the rules engine, and a dynamic body having the name of the attachment on it.
In this example, the file sent to the workflow is called Attachment_jerome.xps
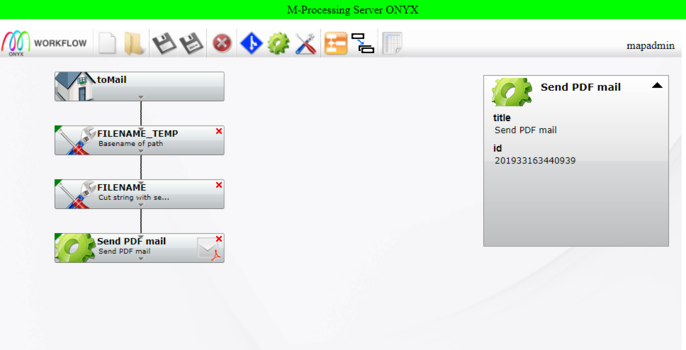
Let's take the following workflow as an example:
A) “Parameter” action: FILENAME_TEMP
This action allows you to initialize a variable with part of another variable.
Here we:
- Let's create a variable: FILENAME_TEMP
- Let's initialize this variable with the basename of the MAP_TITLE variable
(ex: MAP_TITLE: C:\Repertoire\attachment_Jerome.xps -> The basename is: attachment_Jerome.xps)
In our example, the value of FILENAME_TEMP is Attachment_Jerome.xps
B) “Parameter” action: FILENAME The goal of this 2nd box is to have a variable (here FILENAME) equal to “Attachment_Jerome” and not “Attachment_Jerome.xps” and then use it.
Here we:
- Let's create a variable: FILENAME
- Let's initialize this variable with the part of the FILENAME_TEMP up to the point
In our example, the FILENAME value is “Attachment_Jerome”. We will use this FILENAME variable to name the attached file and indicate it in the body of the Mail.
C) “Parameter” action: Send_PDF_mail
This action allows you to send the Email.
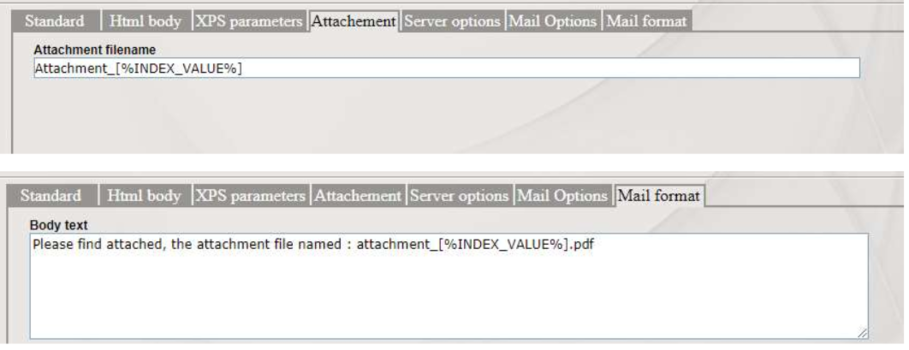
Here we name the attached file with the variable FILENAME (here in blue: Corresponds to a parameter and not to a hard value)
Note: It is possible to call a variable by indicating [%, and this time in VALUE mode (black text).
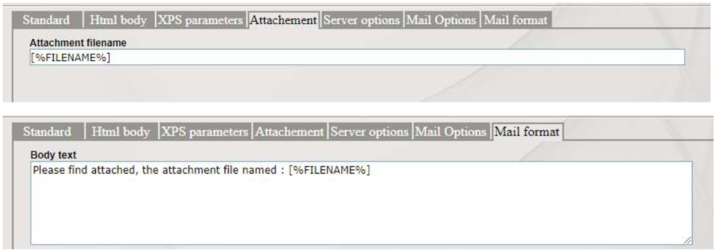
In our example, the parameter would be:
In this case, we are mixing hard text with a variable. Therefore the variable must absolutely be specified with [% because we cannot mix PARAM values (blue) with VALUE values (black)
Variant 3: Sending email with attachment name coming from an index in the input XPS file
In this example, we send an email with an attachment having a dynamic name equal to a value of an index present in the XPS file, and a dynamic body having the name of the attachment on it.
In this example, the sent file has an index called IDX_QNUFAC with the value 00057109
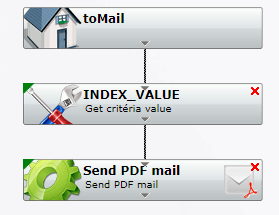
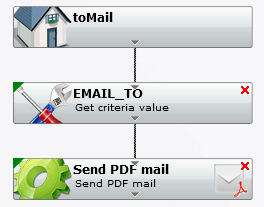
Prenons pour exemple le workflow suivant :
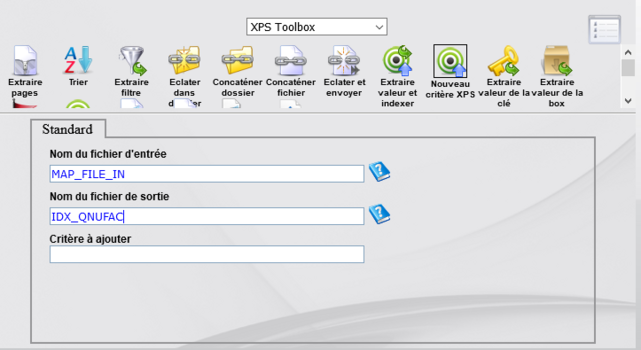
A) Action « Parameter » : INDEX_VALUE
Cette action permet d’initialiser une variable avec la valeur d’un index présent dans le fichier XPS reçu en entrée.
Ici nous :
- Créons une variable : INDEX_VALUE
- Initialisons cette variable avec la première valeur de l’index IDX_QNUFAC trouvé dans le fichier XPS (ici 00057109)
Dans cet exemple, la valeur du IDX_QNUFAC est « 00057109 »
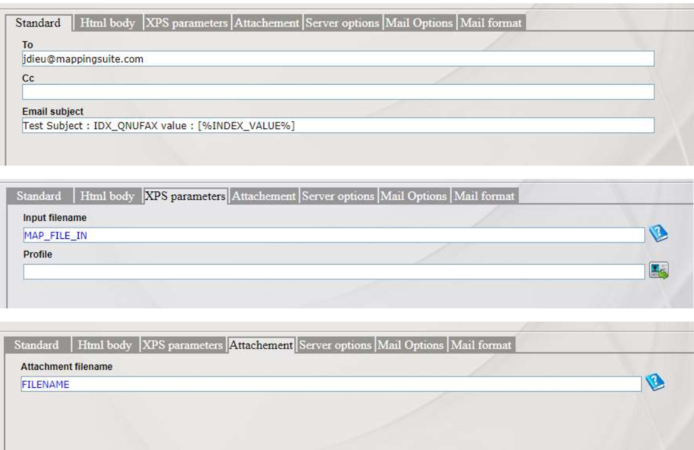
B) Action « Parameter » : Send_PDF_mail
Cette action permet d’envoyer le mail.
Ici nous nommons le fichier joint avec la variable FILENAME (ici en bleu correspondant à un paramètre et non à une valeur en dur).
Remarque : Il est possible d’appeler une variable en indiquant [%, et cette fois-ci en mode VALEUR (texte en noir).
Dans notre exemple, le paramètre serait :
Variante 4: Envoi de mail avec une adresse de destination variable
La méthode est la même que pour le nom de la pièce jointe variable.
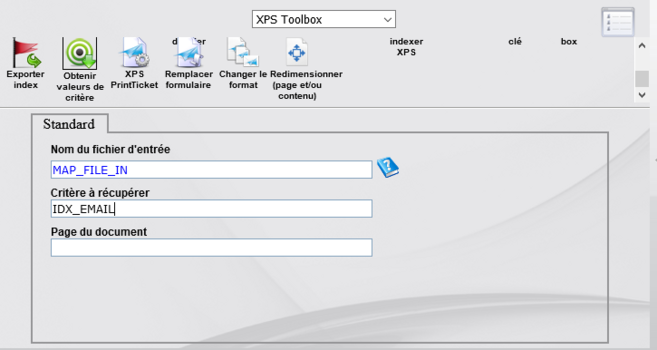
Il faut initialiser une variable avec la valeur de l’adresse email et l’utiliser dans l’onglet.
Ici la variable « EMAIL_TO » est initialisée avec la valeur de l’index du fichier XPS en entrée « IDX_EMAIL »
Ensuite, sa valeur est utilisée dans la boite « Send PDF mail ».
Dans ce cas, nous mixons du texte en dur avec une variable. Par conséquent la variable doit absolument être spécifiée avec [% car nous ne pouvons pas mixer des valeurs PARAM (bleu) avec des valeurs VALUE (noir)
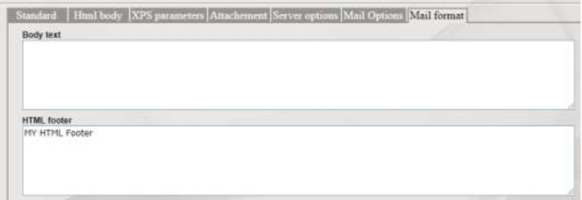
Cette variante permet l’envoi d’un PDF par email en spécifiant un BODY et un FOOTER. Pour cela, il faut utiliser le body du 2ième onglet « HTML Body ». Le Html Body de l’onglet « Mail format » n’est pas pris en compte.
1) Tout d’abord, spécifions l’adresse de destination et le sujet de l’email :
2) Ensuite, spécifions la valeur du corps du mail :
Pour ajouter des sauts de ligne, il faut ajouter la valeur <br>, un simple retour à la ligne (touche Entrée) ne fonctionne pas. On peut également spécifier un corps HTML avec un fichier HTML (voir exemple ci-dessous).
3) Ensuite, spécifions la valeur du footer :
Pour ajouter des sauts de ligne, il faut ajouter la valeur <br>, un simple retour à la ligne (touche Entrée) ne fonctionne pas. On peut également spécifier un corps HTML avec un fichier HTML (voir exemple ci-dessous).
Remarque : Si le « HTML body » et le « Body text » de l’onglet « Mail format » sont tous les deux renseignés, seul le « HTML body » sera pris en compte.
Variante 6: Envoi d'un mail avec un corps HTML appelant un fichier HTML externe
Cette variante permet l’envoi d’un PDF par email comportant un corps HTML venant d’un fichier HTML externe. Le plus gros avantage de cette option est que le fichier HTML peut être généré et géré par une personne extérieure à Mapping (un spécialiste HTML par exemple et non spécialiste MAPPING). Le fait de modifier le fichier HTML aura pour effet de modifier automatiquement le contenu de l’email envoyé par MAPPING, sans toucher les règles de traitement.
1) Tout d’abord, spécifions l’adresse de destination et le sujet de l’email :
2) Ensuite, spécifions la valeur du corps du body HTML via un fichier HTML externe :
On peut également spécifier un corps HTML avec un fichier HTML (voir exemple ci-dessous).
3) Ensuite, spécifions la valeur du footer :
Remarque : Nous pouvons également mettre des données dynamiques dans le fichier HTML en utilisant la syntaxe [[ ]] pour les indexes ou les [% %] pour les variables d’environnement. Exemple: Bonjour Mr [%NOM%],
Variante 7: Envoi d'un mail avec un corps HTML appelant un fichier HTML externe ayant des données variables
Cette variante permet l’envoi d’un PDF par email comportant un corps HTML venant d’un fichier HTML externe. Ce fichier HTML comporte des valeurs dynamiques venant d’index du fichier XPS en entrée et de paramètres initialisés via des données du fichier d’entrée ou autre.
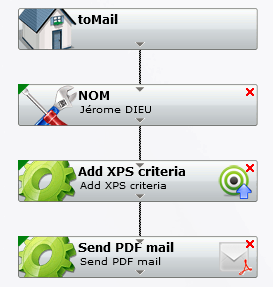
Prenons le workflow suivant :
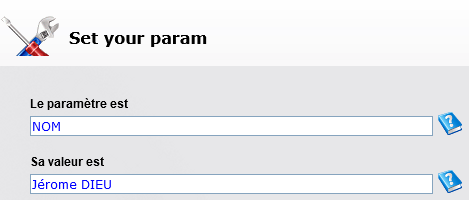
1) Pour notre exemple, créons et initialisons une variable d’environnement « NOM » avec la valeur « Jérôme DIEU »
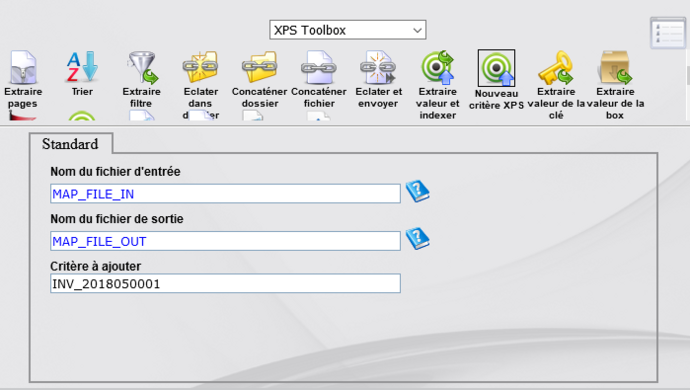
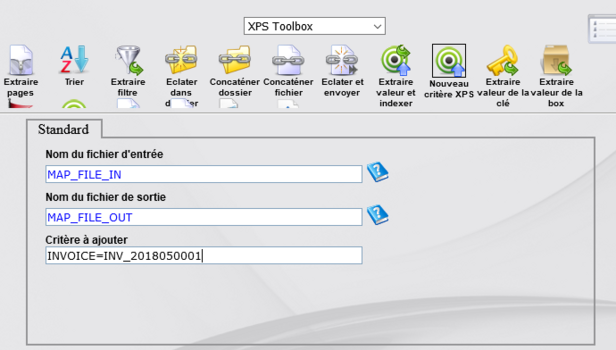
2) Pour notre exemple, créons et initialisons un index « INVOICE » avec la valeur « INV_2018050001
3) Convertissons et envoyons le PDF en utilisant le fichier HTML ayant le contenu comme ci-dessous :
Dear [%NOM%],
Please find enclosed your invoice N°[[INVOICE]]
Best regards
Voici l’appel du fichier HTML :
Le mail reçu a bien le contenudu fichier HTML comme corps.
Variante 8: Envoi d 'un mail avec un corps HTML appelant un fichier HTML externe dynamique fonction d'un code société
Cette variante permet l’envoi d’un PDF par email comportant un corps HTML venant d’un fichier HTML externe. Ce corps HTML est variable et est basé sur le code société reçu dans le fichier d’entrée.
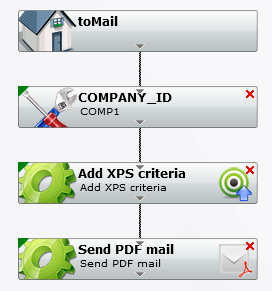
Prenons le workflow suivant :
1) Pour cet exemple, il faut avoir 2 fichiers HTML, un fichier HTML pour la société 1 (COMP1.html comportant le logo de la société 1 par exemple et d’autres informations unique à cette société 1) et un autre fichier HTML pour la société 2 (COMP2.html comportant le logo de la société 2 d’autres informations unique à cette société 2)
2)Pour notre exemple, créons et initialisons une variable d’environnement « COMPANY_ID » avec la valeur du code société (venant par exemple du fichier d’entrée via un rulefile) : Dans notre exemple, je l’initialise en dur à « COMP1 »
3)Ensuite, créons et initialisons une variable d’environnement « NOM » avec la valeur « Jérôme DIEU »
4)Pour notre exemple, créons et initialisons un index « INVOICE » avec la valeu " INV_2018050001"
Voici l’appel du fichier HTML Le mail reçu a bien le contenu du fichier HTML comme corps
5)Convertissons et envoyons le PDF en utilisant le fichier HTML ayant le contenu comme ci-dessous :
Ici, le fichier HTML est appelé dynamiquement selon la valeur du COMPANY_ID.
Remarques
1) Il est possible de renseigner plusieurs destinataires en copie cachée avec chaque adresse séparée par un point-virgule « ; ».
2) Si le « HTML body » et le « Body text » de l’onglet « Mail format » sont renseignés tous les deux, seul le « HTML body » sera pris en compte.
3) Pour écrire un body il faut utiliser le body HTML (présent dans le second onglet), si on utilise le « Body text » de l’onglet « Mail format », le body sera absent.
