ONYX - MMC
ONYX Mapping Management Console/en
Introduction
The centralised console of MAPPING (Mapping Management Console : MMC) gives the possibility to monitore multiple MAPPING servers at the same time through a very intuitive Graphical User Interface. To do so, we need :
- To install NodeJS (v14 minimum) on the machines hosting the MAPPING servers to monitore (prerequisite for the spooler APIs)
- To install the spooler APIs on the machine hosting one or multiple MAPPING environments (1 API spooler per machine) and start them on each of the instance to monitore.
- To install the MAPPING Management Console (MMC)
Prerequisites
- One (or multiple) ONYX MAPPING servers installed and configured (Spooler APIs available and configuration done)
- Install NodeJS (v14 minimum) (Node.js ) on the machine(s) hosting the MAPPING instances to monitore
NodeJS
NodeJS is a prerequisite for the installation of the MAPPING spooler APIs. We provide a example of the installation on CENTOS.
If you run on another distribution, please refer to the installation guide for this distribution.
Exemple d'installataion sur centos
curl -sL https://rpm.nodesource.com/setup_14.x | bash - && yum -y install nodejs
Installation
Installation on a VM
Command of mapping-spooler-api
You use npm to installe the command
The registry npm used is private, and then requires an authentification.
Installation sur une VM
Command de mapping-spooler-api
Comme mentionné précédent, les APIs du spooler doivent être installée une fois par machine hostant le ou les environnements MAPPING à monitorer.
La commande s’installe avec npm (gestionnaire de paquet, installé avec NodeJS).
Le registre npm utilisé est privé, et nécessite donc une authentification.
Authentification
npm login --registry http://npm-registry.mappingsuite.com:4873
username : partnermappingsuite
password : (voir sur LastPass : [M-S] IT> NPM Registry for Partner )
email : partner_mappingsuite@mappingsuite.com
Installation
npm install -g mapping-spooler-api --registry http://npm-registry.mappingsuite.com:4873
Installation Avec Docker
L’API Spooler doit absolument être installé sur le même hôte que le serveur Mapping Onyx.
We must therefore add the spooler API installation to the docker MAPPING ONYX image.
Example of Dockerfile
# Base Image Mapping Suite Server
FROM mappingsuite.azurecr.io/onyxserver:10.2.0
# NPM Registry Token for Authentication
ARG npm_token
# Update & Supervisor (for running Onyx + Rest API in parrallel)
RUN yum -y install epel-release && \
   yum -y update && \
   yum -y install supervisor
# Install NodeJS
RUN curl -sL https://rpm.nodesource.com/setup_14.x | bash - && \
   yum -y install nodejs
# NPM Private Registry Authentication
RUN npm set //npm-registry.mappingsuite.com:4873//:_authToken ${npm_token}
# NPM install mapping-spooler-api with private NPM Registry
RUN npm install -g mapping-spooler-api --registry http://npm-registry.mappingsuite.com:4873
# Required env var for API REST
ENV PORT=8080
ENV MAPPING_PATH=/apps/mapping/data/conf/mapping.conf
# Supervisor Configuration
RUN echo "[supervisord]" > /etc/supervisord.conf  && \
 echo "nodaemon=true" >> /etc/supervisord.conf  && \
 echo "[program:spooler-api]" >> /etc/supervisord.conf  && \
 echo "command=bash -c 'sleep 5 && exec mapping-spooler-api'" >> /etc/supervisord.conf  && \
 echo "[program:onyx-server]" >> /etc/supervisord.conf  && \
 echo "command=/home/docker/scripts/init.sh"  >> /etc/supervisord.conf
EXPOSE 8080
# Run Supervisor
ENTRYPOINT ["/usr/bin/supervisord"]
This Dockerfile uses a parameter "npm_token” to authenficate itself on our npm registery.
A token can be obtained using the following command :
curl -s -H "Accept: application/json" -H "Content-Type:application/json" -X PUT --data '{"name": "mappingdev", "password": "PASSWORD"}' --user mappingdev:PASSWORD http://npm-registry.mappingsuite.com:4873/-/user/org.couchdb.user:mappingdev
Build-up of the image :
docker build . -t onyxserver-api --build-arg npm_token=$TOKEN
Configuration
one the command installed, you need to configure each ONYX server to define the HTTP porte used by the spooler APIs.
This can be done using the mapping.conf entry SPOOLER_API_PORT on each MAPPING server to monitore.
This value must be unique on each ONYX server installed on the VM.
Example
<block name="WEB CONFIG">
 <group>
  <element>
   <info name="[SPOOLER_API_PORT]">8080</info>
  </element>
 </group>
</block>
Note:These port numbers will be useful when adding the server to the MMC server interface.
starting the API service
To start the HTTP API, you simply need to run the mapping-spooler-api, while the MAPPING_PATH environmeent variable define on the desired Onyx server.
This kind be done using the mappingenv command to select the desired Onyx environment, then run the mapping-spooler-api.
Note: The mapping-spooler-api command never gives the hand back and does not have an option to run in background.
To run the command in background, we do as follow :
mapping-spooler-api > /dev/null 2>&1 &
(or using tools as supervisor) The SPOOLER_API_PORT option of the mapping.conf is optionnal. If it is not present, the API will look for a environment variable PORT.
Mapping Management Console
Installation
L’installation de l’interface MMC ne peut se faire qu’avec Docker.
Image : mappingsuite/management-console-full
username : partnermappingsuite
password : (voir sur LastPass : [M-S] IT> DockerHub partner )
Exécution sans aucune sauvegarde, avec le user admin par défaut (mapadmin/mapadmin), interface disponible sur le port 8003 :
docker run -p 8003:80 mappingsuite/management-console-full
Il est possible de définir le nom et le mot de passe du compte admin par défaut, via les variables d’environnement ADMIN_USERNAME et ADMIN_PASSWORD, exemple :
docker run -p 8003:80 -e ADMIN_USERNAME=MyAdmin -e ADMIN_PASSWOR=MyPassword mappingsuite/management-console-full
Pour sauvegarder les données (users et instances mapping créés) il faut utiliser un volume sur le répertoire mapping/data
docker run -p 8003:80 -v /my/data/:/mapping/data mappingsuite/management-console-full
Note : L’image docker utilise un user mapping, utiliser un chemin local comme volume risque de poser des problèmes de droits d’accès, il est préférable d’utiliser un volume docker.
Les logs peuvent aussi être sauvegardées avec un volume sur le dossier /mapping/logs.
docker run -p 8003:80 -v /my/logs/:/mapping/logs mappingsuite/management-console-full
Exemple de docker-compose .yml :
version: '3.2'
services:
 mmc:
  image: mappingsuite/management-console-full
   ports:
     - "8003:80"
   environment:
     - ADMIN_USERNAME=admin
     - ADMIN_PASSWORD=Mapping1234
   volumes:
     - mapping-data:/mapping/data
     - "/home/mmc/logs:/mapping/logs"
volumes:
 mapping-data:
Utilisation
Création d'une instance MAPPING
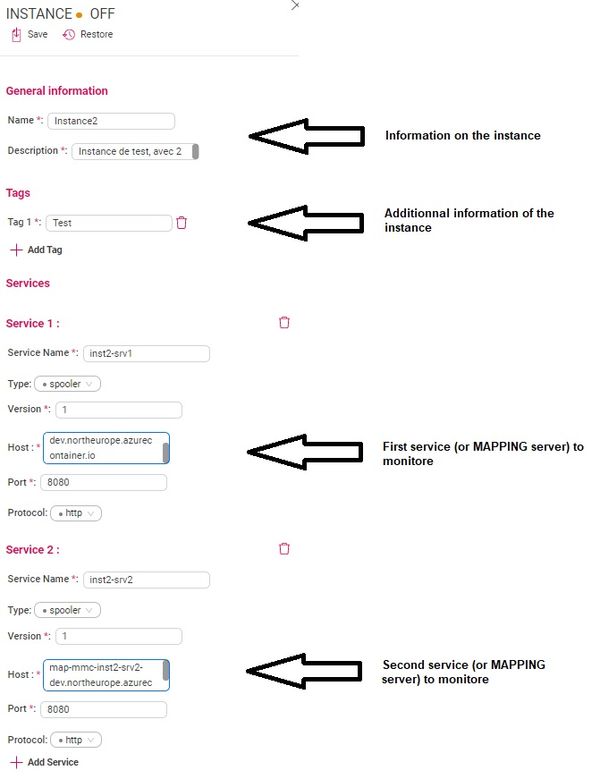
Une instance est un regroupement d'environnement MAPPING (ou service).
Menu Instances / +Add
A l'intérieur il faut créer des services correspondant aux serveurs MAPPING à monitorer
