ONYX - 9.0 - Utilisation
PDF file generation
Sommaire
Interface description
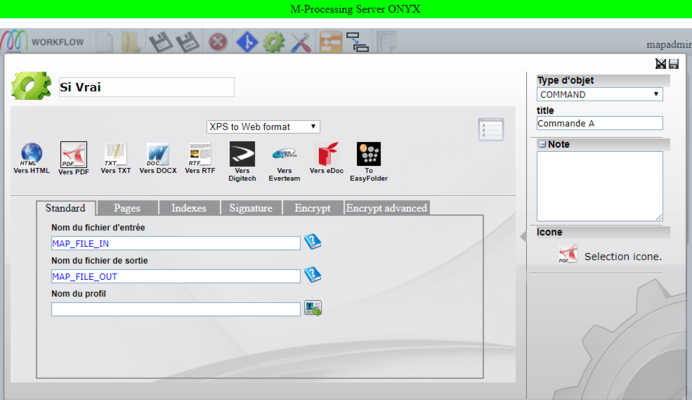
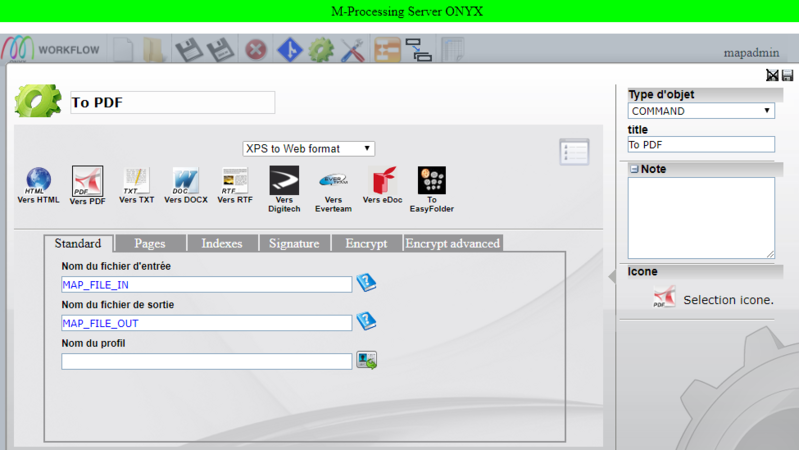
To access the PDF generation interface, double-click on the command in question, choose "XPS to Web format", choose "Vers PDF".
Standard tab
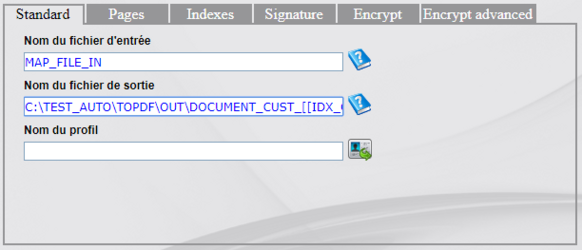
Input filename: XPS file to convert to PDF (path + file name entered in hard text or MAP_FILE_IN)
Output file: Path + name of the PDF file(s) to generate (hardcoded or MAP_FILE_OUT)
Profile: Conversion profile to use (OPTIONAL)
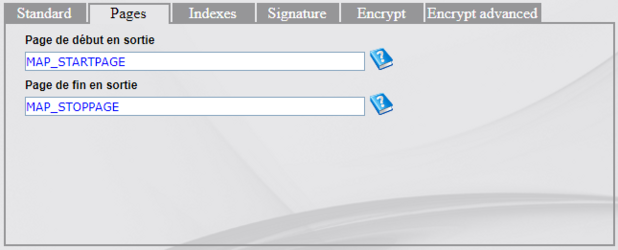
Pages tab
These parameters allow you to specify the start page number and the end page number of the PDF to be generated.
Output start page: Start page number (hardcoded value or MAP_STARTPAGE parameter including the page numbers of the input XPS file)
Output end page: End page number (hardcoded value or MAP_STOPPAGE parameter including the page numbers of the input XPS file)
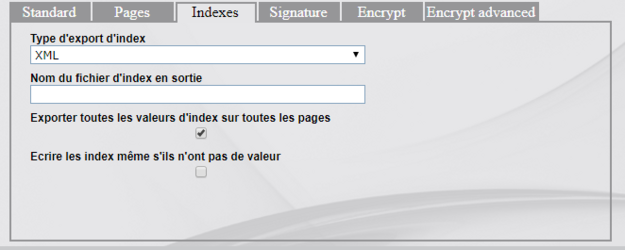
Indexes tab
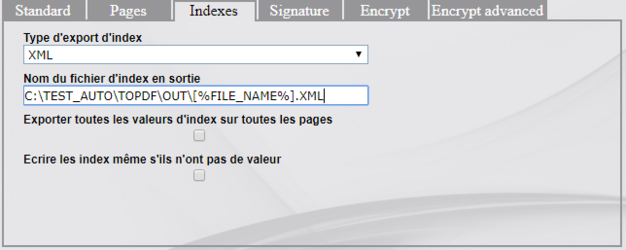
This tab allows you to generate an index file (XML, TXT or CMOD) with the PDF file(s) (Index Files) Index export type: This parameter allows you to specify the type of index files generated
Output index file name: This parameter allows you to specify the path and name of the index file to generate
Export all indexes values on all pages: This setting defines how to export the values.
Either the index file contains the indexes of all pages (checked), or the index file only contains the index once. (Pages with the same index are not repeated)
Export indexes with no value: If checked, this parameter also allows you to export indexes with an empty value, otherwise (unchecked), only indexes with a non-zero value will be exported.
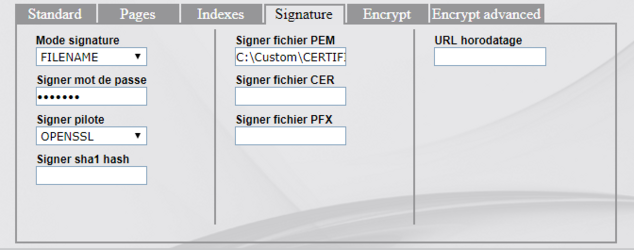
Signature tab
All of the following parameters allow you to affix an electronic signature to PDF documents output from Onyx Server:
<signclass>3</signclass>
<signmode>FILENAME</signmode>
<signpassword>test</signpassword>
<signdriver>OPENSSL</signdriver>
<signsha1hash>3eb783643e522c81d1e34c1943e6f4163e9ad439</signsha1hash>
<signpemfile>C:\tmp\test.pem</signpemfile>
<signcerfile>C:\tmp\test.cer</signcerfile>
<signpfxfile>C:\tmp\valid.pfx</signpfxfile>
<timestampurl>http://servertemp.domain/tsp</timestampurl>
By default, PDF documents produced by Onyx Server are not signed.
If signmode is empty then Signing is disabled and none of the other settings will have any effect
Encrypt tab
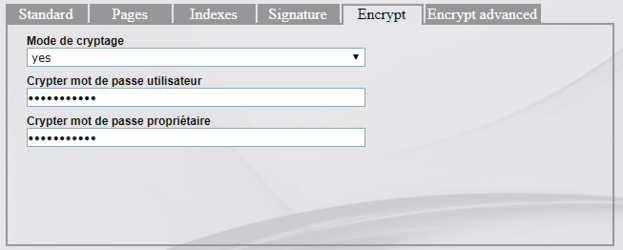
This tab allows you to protect the PDF file with a password (obligatory when managing special rights for PDFs, see “Encrypt advanced” tab).
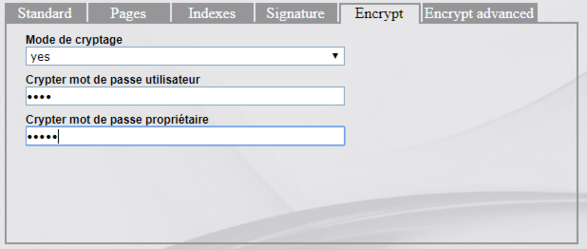
Encrypt mode: This parameter allows you to activate or deactivate the setting of a password on the PDF:
- Default: Encryption is disabled
- No: Encryption is disabled
- Yes: Encryption is enabled
Encrypt user password: This parameter allows you to enter a password which will be requested each time the PDF is opened. Access via user password does not give access to blocked features.
Encrypt owner password: This parameter allows you to enter a password that will be requested to be able to modify permissions (printing, modification, copying, etc.) once the PDF is created.
Notes:
- If the user password and owner password are the same, the user will have full permissions when opening the file.
- Adobe Reader asks for the password when opening only if there is a user password. If there is only one owner password, you can only switch to owner mode with the paid version of Adobe Reader.
- The “Encrypt mode” parameter at default = no.
- If the “Encrypt mode” parameter is no = no management of passwords and file rights is taken into account.
Encrypt advanced tab
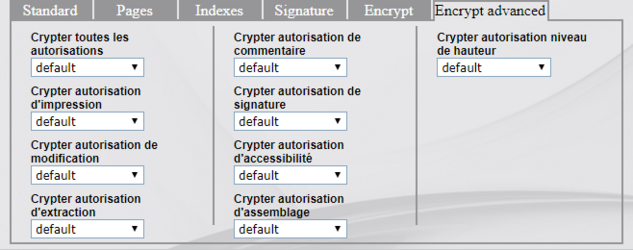
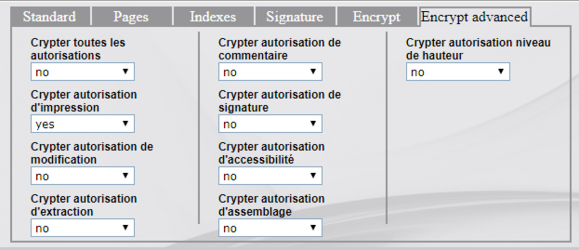
This tab allows the management of special rights applied to the generated PDF file. The rights in question are:
- Printing rights: Gives the option to print the PDF or not
- Right to modify: Gives the possibility or not to modify the PDF (via Acrobat Reader Pro for example)
- Page extraction right: Gives the possibility or not to extract pages (via PDF Fill for example):
- Right to comment: Gives the possibility or not to add comments
- Right of signature: Gives the possibility or not to affix a signature
- Accessibility right: Gives the possibility or not to copy the content of the PDF file
- Right of assembly: Gives the possibility or not to modify the order of the pages, to delete or to insert them
- Page height right: Changes the printing resolution If No = Low resolution (150pp), if Yes = High resolution
Notes:
- To play with the different rights, you must set a user password and owner password. (Encrypt tab) and open the PDF with the user's password. :
- The owner still has all rights to the PDF (so the rights specified in the “Encrypt advanced” tab are not taken into account).
- The user has the rights specified in the “Encrypt advanced” tab
- The “default” value is set to YES.
- If “Encrypt allow all” = YES or DEFAULT then the user has all rights
- If “Encrypt allow all” = NO then the user has the rights specified in the following drop-down lists
Examples
Variant 1: Creation of a simple PDF
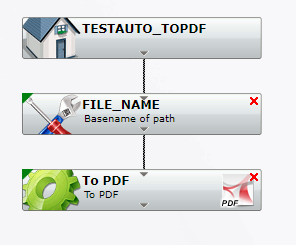
Let's take the following workflow as an example:
A) “Parameter” action: FILE_NAME
This action initializes a variable with part of another variable.
Here we:
- Let's create a variable: FILE_NAME
- Let's initialize this variable with the basename of the MAP_TITLE variable
(ex: MAP_TITLE: C:\Directory\myfile.txt -> The basename is: myfile.txt)
This variable is used in naming the PDF.
See documentation: Workflow String
B) “Parameter” action: FILE_NAME
This action converts an XPS file to PDF.
The name of the PDF will depend on the variable created previously.
Variant 2: Creating a PDF file with an index file
This variant allows in addition to creating a PDF file, the creation of an XML file listing the indexes of the original XPS file.
Examples of index file generation:
“Export all index values on all pages” unchecked
“Write indexes even if they have no value” unchecked
- Exports indexes only once (only on the first page found)
“Export all index values on all pages” Unchecked
“Write indexes even if they have no value” Checked
- Export the indexes only once (only on the first page found)
- Export of indexes without value ex: IDX_DESCRL
“Export all index values on all pages” Checked
“Write indexes even if they have no value” Checked
- Exports the indexes of all pages, even if having the same values as the previous page.
Variant 3: Explosion by index value
In the example above (Variant 2), we saw that the original XPS file has indexes on certain pages. This variation shows how we can use these indexes to create a PDF file by index value. Let's take for example a 3-page XPS file, 1 page per different client. We want to split the PDF by customer number (Index IDX_CUSTOMER).
- Note 1: The [[INDEX_NAME]] syntax in the PDF name generates 1 PDF per different index value [[INDEX_NAME]]
- Note 2: If in the name we have 2 index values:
C:\TEST_AUTO\TOPDF\OUT\DOCUMENT_[[IDX_DOCNUM]]_CUST_[[IDX_CUSTOMER] ].pdf
There will be as many PDF files created as combinations of different values of the 2 indexes.
In this example:
3 one-page PDF with the name DOCUMENT_CUST_00001.pdf, DOCUMENT_CUST_00002.pdf, DOCUMENT_CUST_00003.pdf
Variant 4: Rights management
This variant allows you to create a PDF file with specific rights.
1) First, you need to specify a password for the owner and a password for the user:
The “encrypt mode” must be YES. Otherwise encryption will not be activated and the passwords entered will have no effect. Here, the user password is “user” and the owner password is “owner”.
2) Then, you must enter the specific rights:
“Encrypt allow all” must be set to NO (if YES then the user will have all rights, regardless of the rights specified). The user will only have printing rights on the generated PDF. The user is the person who opens the PDF with the user password: “user”.
If the PDF is opened using the owner password “owner”, then all rights will be authorized.
Note: On Acrobat Reader, the “Assemble Document” and “Extract Pages” rights are always “Not Allowed”. Acrobat Reader automatically disables these two permissions, even if the original PDF has them.
